1. What SelectOR is
SelectOR is an alternative menu and launcher for Open Rails. From a single window you choose the route, train, path, time, season and weather, see the train in 3D and 2D, check the route map and start the simulation. It does not modify Open Rails: it reuses the components you already have installed.
It also includes the Companies section, an optional online mode where several drivers share a railway company: fleet, bank, services, ranks, rankings and station announcements. While you drive, SelectOR lays its own tools over Open Rails: the HUD with mini-map and timer, the quick-access bar and the cab panel with gauges, speedometer and controls.
This manual is a complete tutorial of the interface. It first explains the requirements and the main window. Then it follows the work of the three roles in a company:
| Role | Who | What they do |
|---|---|---|
| Driver | Any member of the company. | Drives services with the fleet's trains and checks services, the bank, rankings and their profile. |
| Supervisor | A trusted member appointed by the manager. | Everything a driver does + buys and rents trains, looks after the fleet, admits members and manages the station announcements. |
| Manager | Whoever creates the company. | Everything a supervisor does + assigns the roles (including manager). |
The SelectOR screenshots were taken with example data: the company «Ferrocarriles del Sur», its members, accounts and services are fictitious. The trains, routes and stations are real Open Rails content. The driving overview (chapter 9) is a real Open Rails screenshot with the SelectOR tools (shown in Spanish there).
2. Requirements
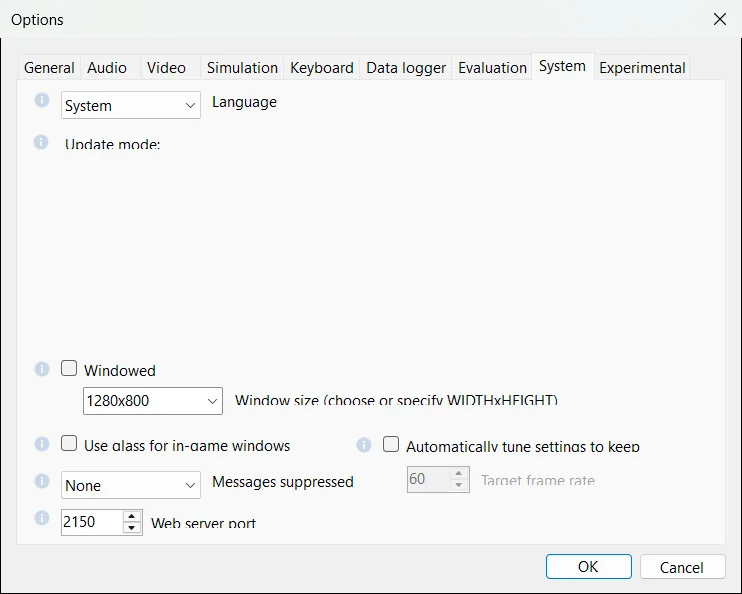
The SelectOR driving tools read the state of the train live from the Open Rails built-in web server. For them to work, Open Rails must have its Web server port active and set to port 2150.
These tools are:
- the HUD with mini-map, timer and distance;
- the quick-access bar;
- the cab panel (gauges, speedometer and controls);
- the passengers;
- the station announcements;
- the measurement of distance and time of company services.
How to check it: in SelectOR press OR Options → System tab → Web server port field = 2150 → OK.
SelectOR connects to http://127.0.0.1:2150, only inside your own computer. No other program may be using that port.
What happens if the web server is not active
SelectOR shows no error, but the driving tools never appear: they keep waiting for Open Rails to report that the scenario has loaded. Also:
- the timer does not start;
- there are no passengers and no station announcements;
- the cab panel receives no data;
- the service distance is estimated from the save file or from the length of the path, instead of being measured live.
2.1 Other requirements
| Requirement | Details |
|---|---|
| System | Windows 10 or 11, 64-bit. |
| .NET | .NET Desktop Runtime 8 (x64) or later. It is a free download from Microsoft: dotnet.microsoft.com/download/dotnet/8.0 → «Desktop Runtime», x64. |
| Open Rails | Installed and working, with your content folders (routes and trains) added in its Options. The official release, Testing and the New Year versions all work. |
| Location | SelectOR.exe must be inside the Open Rails folder, next to OpenRails.exe and RunActivity.exe. If it is started from anywhere else, it shows «SelectOR · wrong folder» and does not start. |
| OR web server | Port 2150 (see the box above). |
| OR display mode | The SelectOR windows float over the simulator. They are visible with Open Rails windowed or in borderless full screen, but not in exclusive full screen. |
| Internet | Only for Companies, automatic updates and the public server list in Multiplayer. Everything else works offline. |
| Screen | Designed for 1600 × 900. On smaller screens the interface shrinks by itself (down to 70 %). It works with any Windows scaling (100 %, 125 %, 150 %…). |
| Language | SelectOR is in Spanish when Open Rails is in Spanish. Otherwise, it is in English. |
3. Installation and first start
When SelectOR opens, a splash screen with a progress bar appears while it reads your routes, trains and locomotives. After that it starts much faster thanks to its content index. If a route or a train is missing, check that its content folder is added in the Open Rails Options.
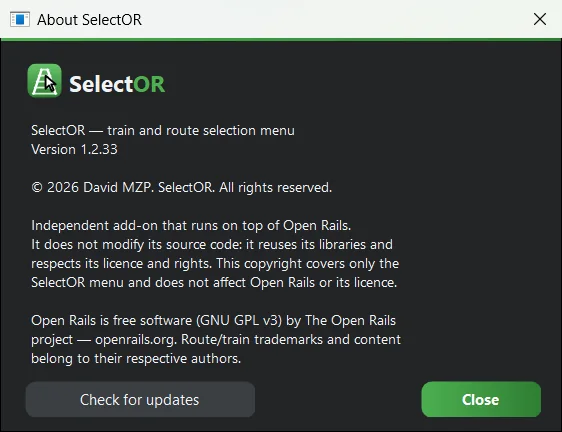
At start-up, and every 3 hours, SelectOR checks for a new version. If there is one, press Download and install: it is downloaded, its digital signature is checked and SelectOR restarts by itself. You can also look for it manually in About SelectOR → Check for updates. It cannot update while Open Rails is open or a service is in progress.
4. The main window
The window has four areas:
- Header:
- the logo;
- the Content selector, to choose the set of Open Rails folders;
- the Resume, OR Options and About SelectOR buttons.
- ROUTES column:
- a search box and the ★ Favourites only check box;
- the list of routes. Double-click to mark or unmark a route as a favourite.
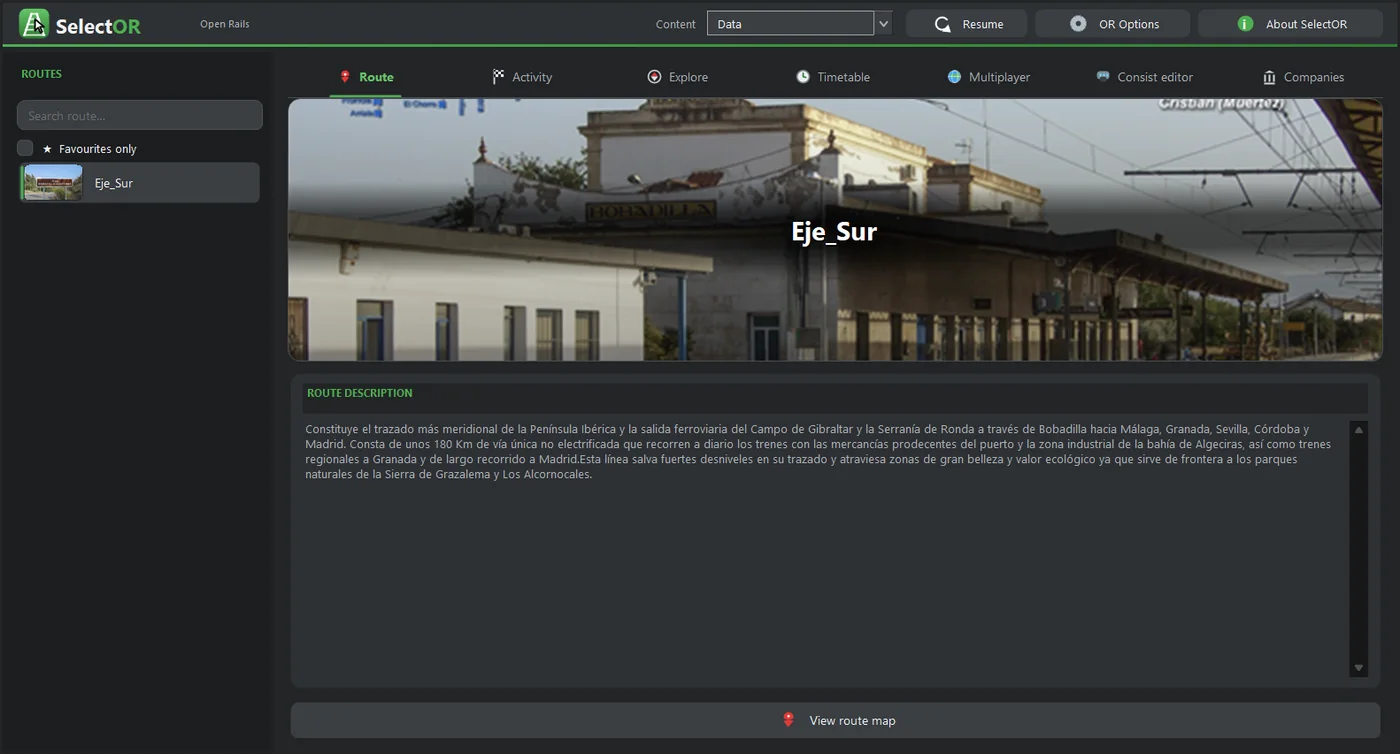
- Central tabs: Route, Activity, Explore, Timetable, Multiplayer, Editor and Companies.
- Bottom bar: a summary of your choice and the action button (DRIVE, CONNECT or Go on duty).
4.1 Activity
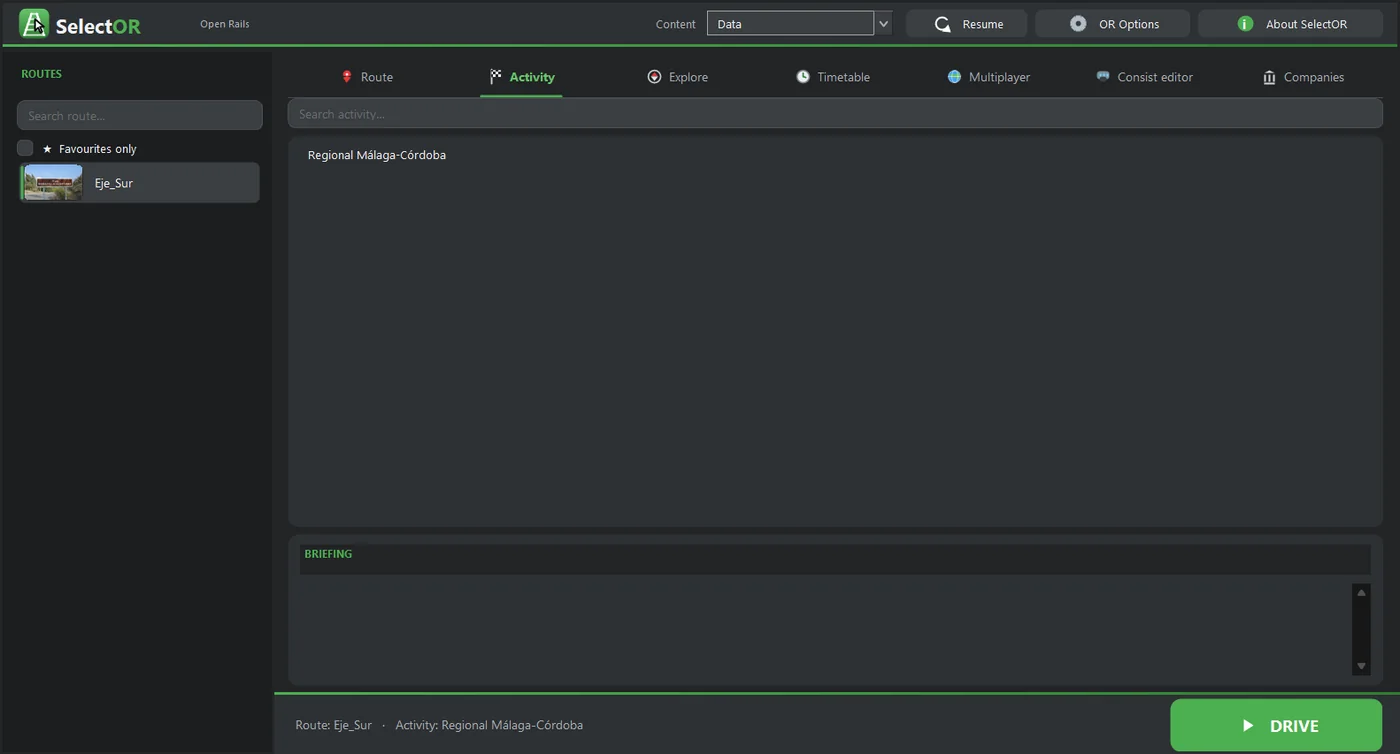
Lists the activities of the route, with a search box and the SUMMARY card. Pick one and press DRIVE, or double-click it.
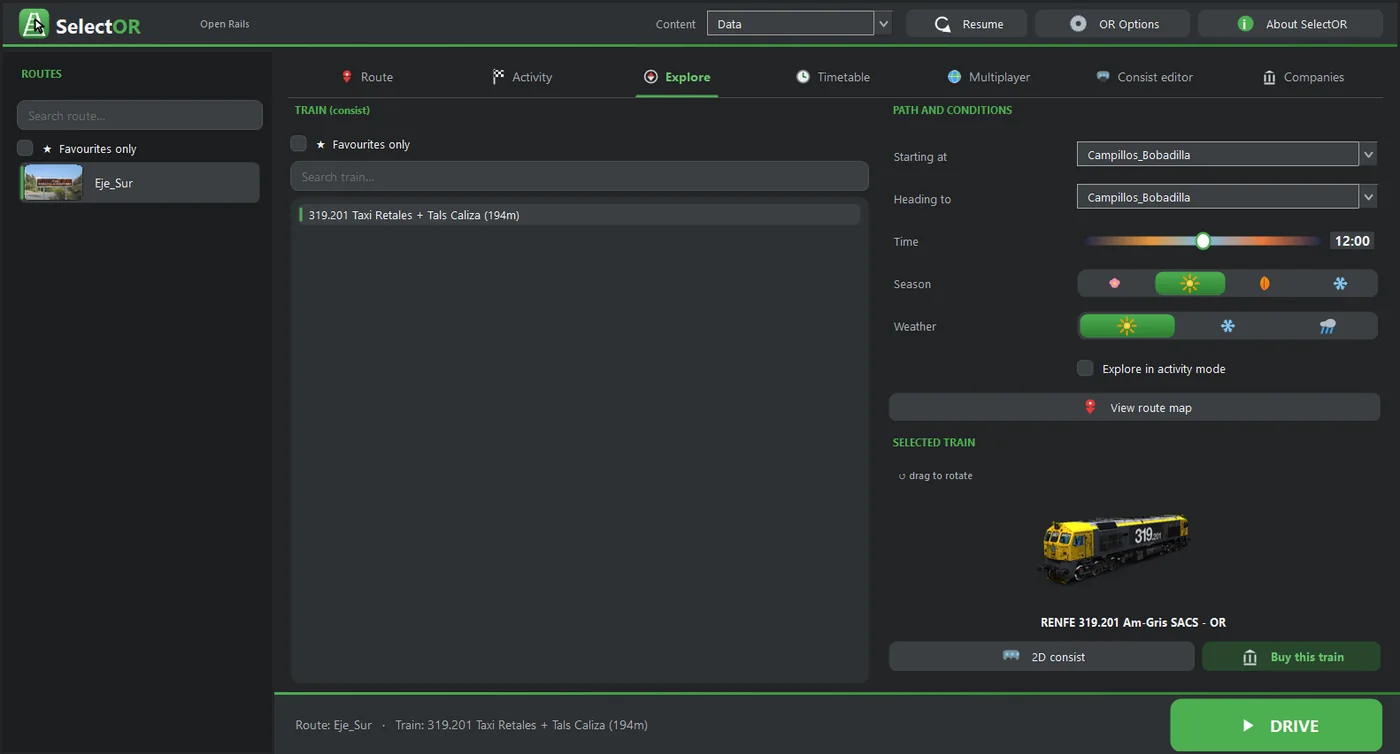
4.2 Explore
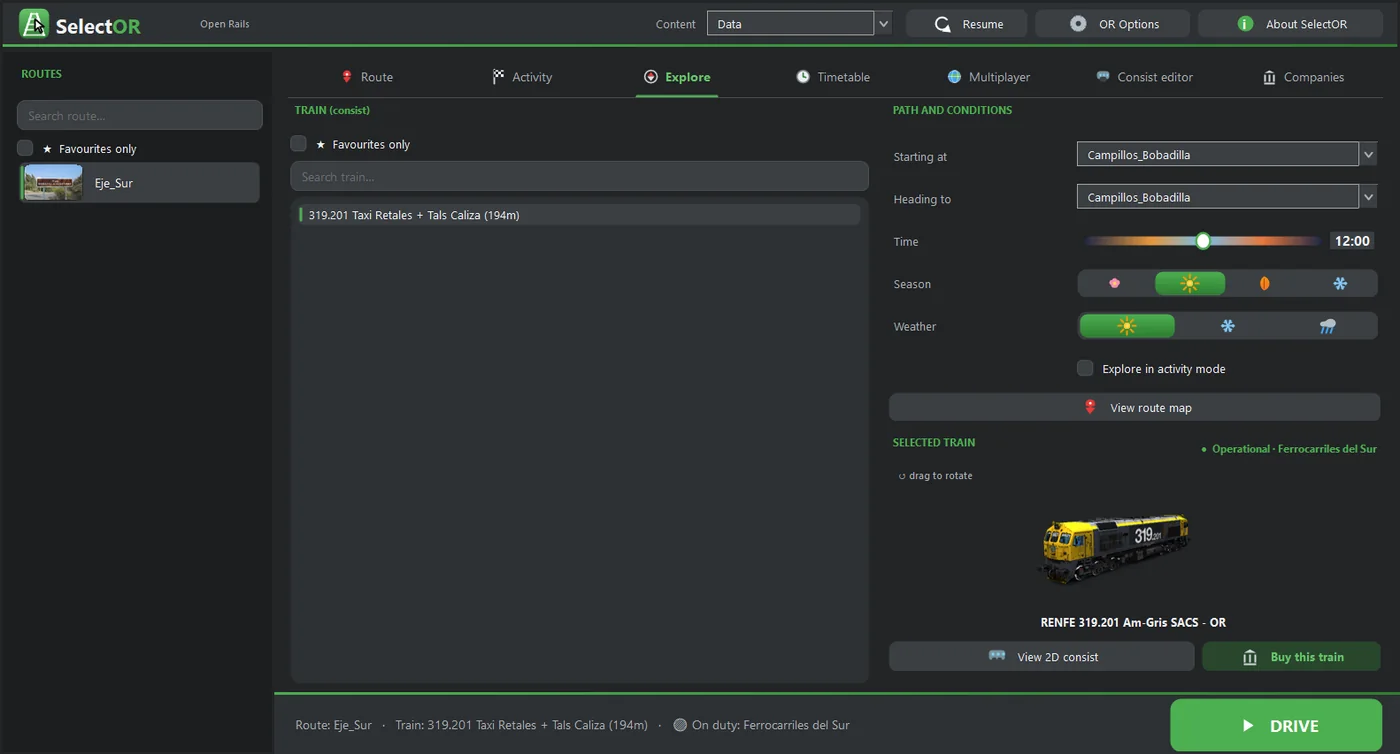
This is the free mode: you choose the train (consist), the path (Starting at → Heading to), the time, the season and the weather. The SELECTED TRAIN card shows the train in 3D:
- drag it to rotate it;
- double-click to return to the initial view.
If you belong to a company, the right side of the title shows whether that train is in its fleet and whether it is available, for example «● Operational · Ferrocarriles del Sur». Supervisors and managers also see the Buy this train button, which opens Companies → Purchase with that locomotive already selected.
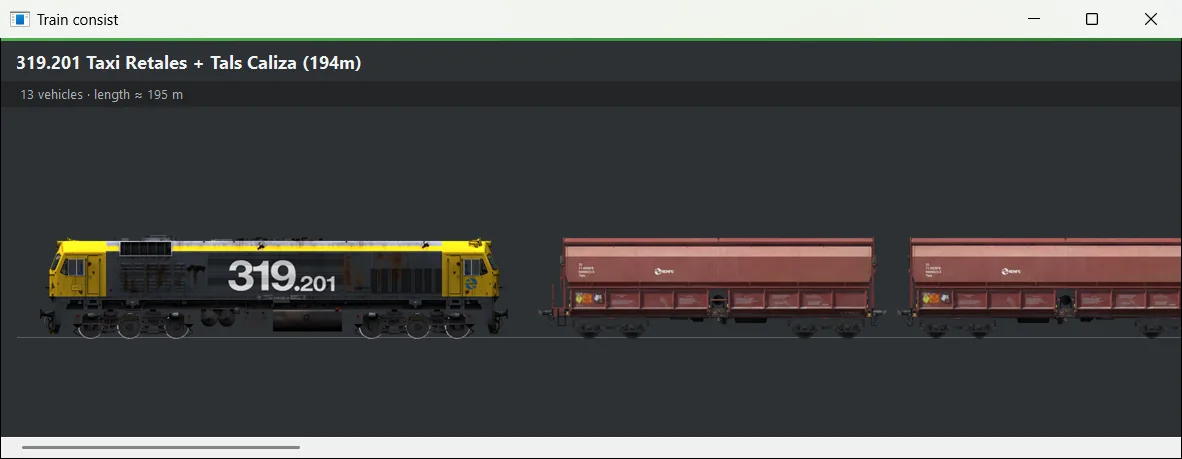
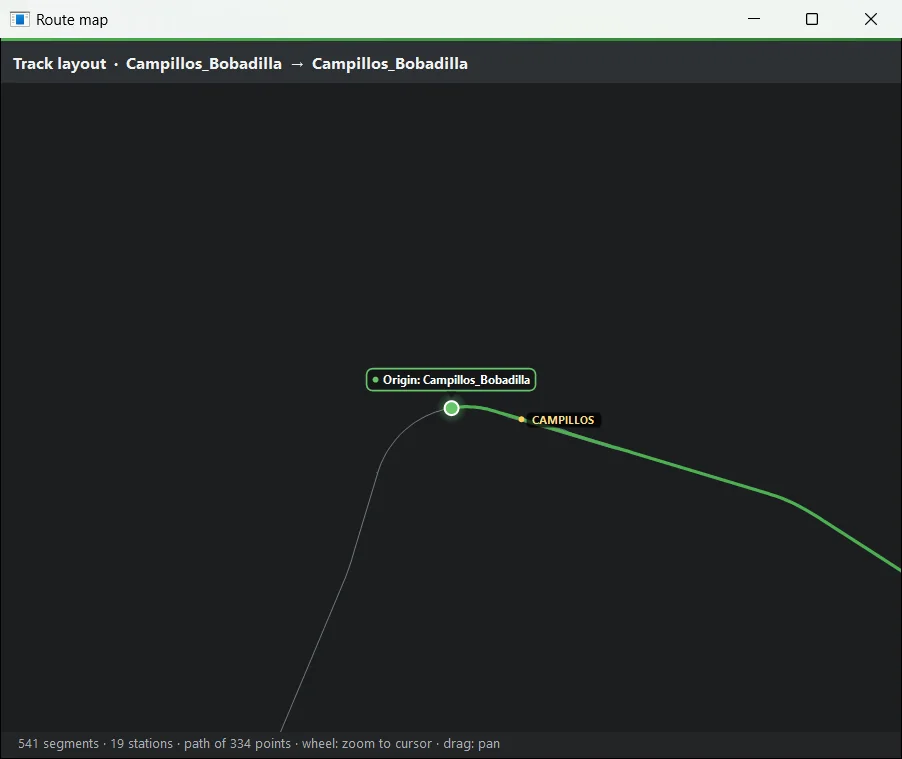
4.3 Timetable
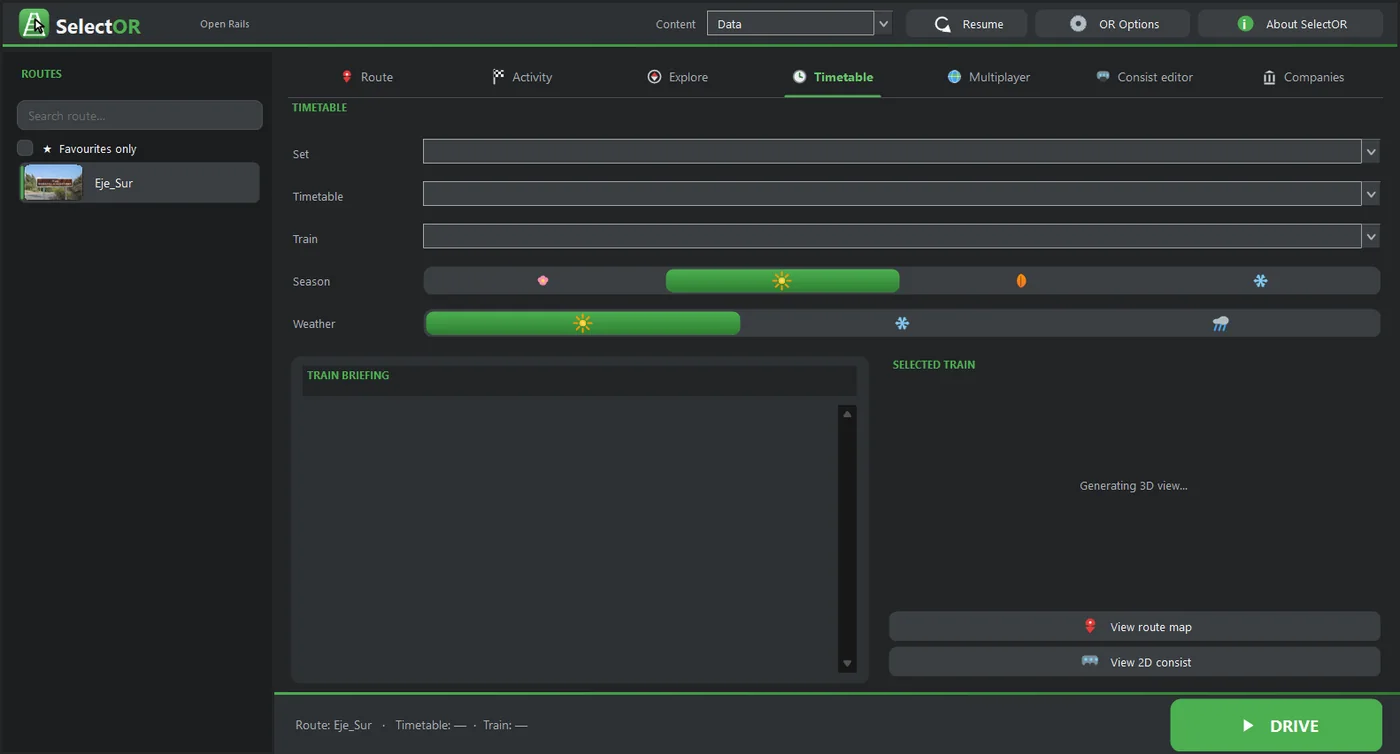
This is the Open Rails timetable mode. You choose Set, Timetable, Train, Season and Weather, with the train summary and the same 2D/3D views. It only has content if the route includes timetables.
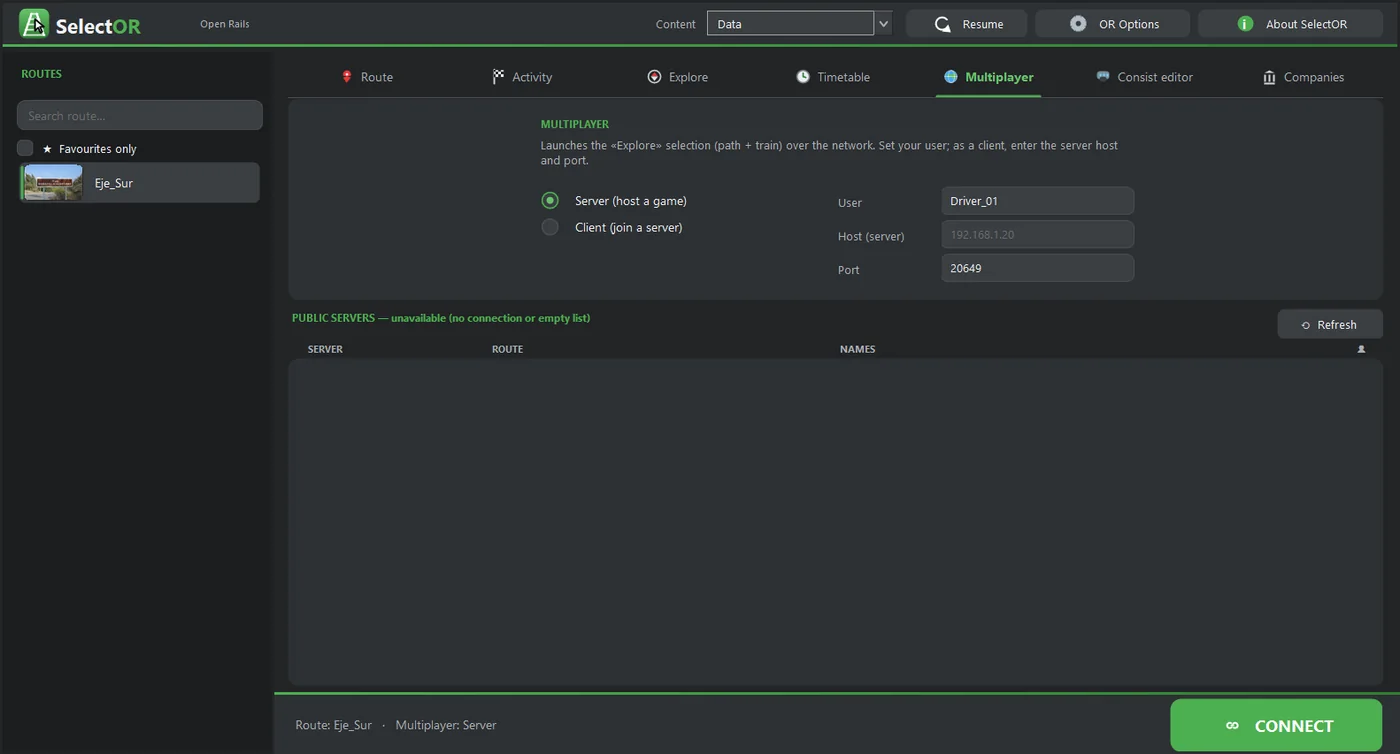
4.4 Multiplayer
Host a game (Server) or join one (Client) by entering User, Host and Port. What is launched is the Explore selection, that is, the path and the train. Below is the list of public servers (tsimserver.com), which needs internet and is refreshed with Refresh.
4.5 Consist editor
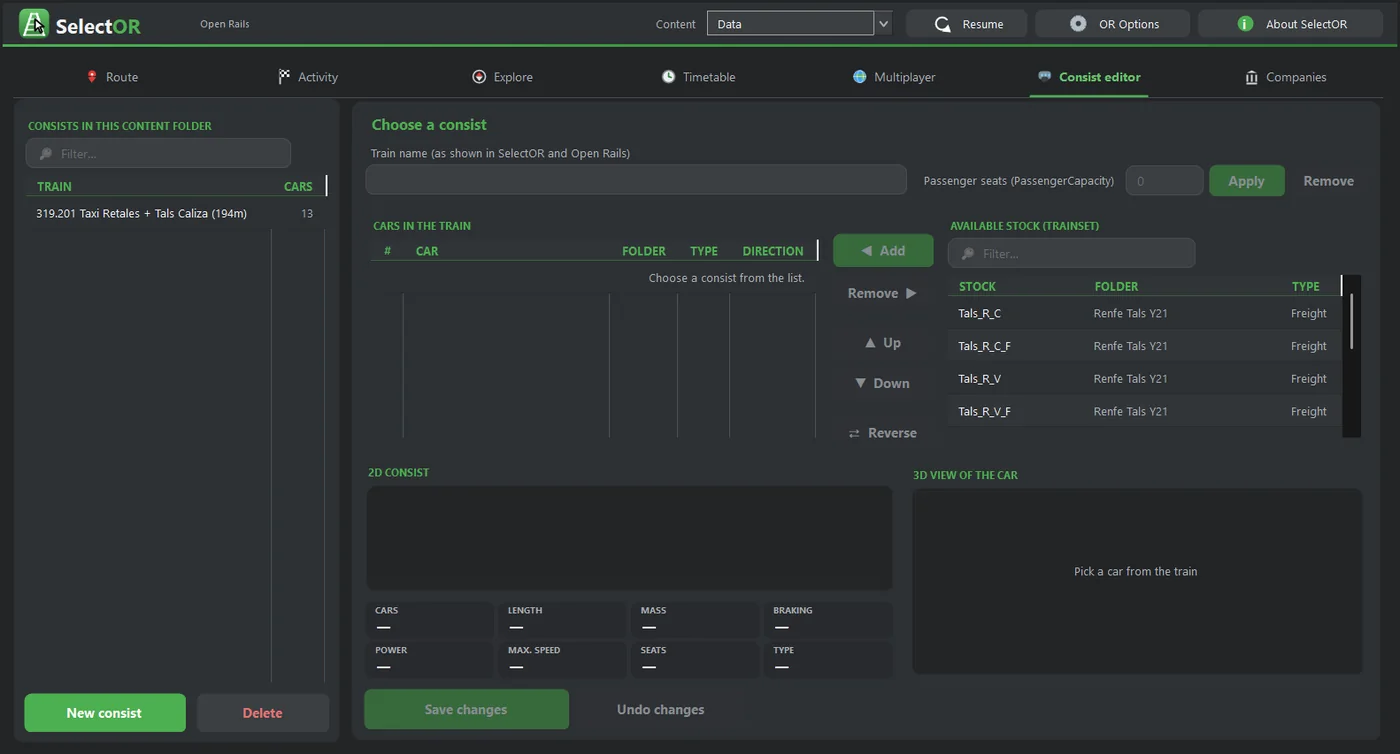
Create, rename, edit and delete trains (.con):
- add cars from the available rolling stock;
- remove them, move them up or down, or flip them;
- set the passenger seats (PassengerCapacity) of each vehicle;
- check length, mass, brakes, power and maximum speed.
Use Save changes to save and Undo changes to discard. When you delete a consist, it goes to the Windows recycle bin.
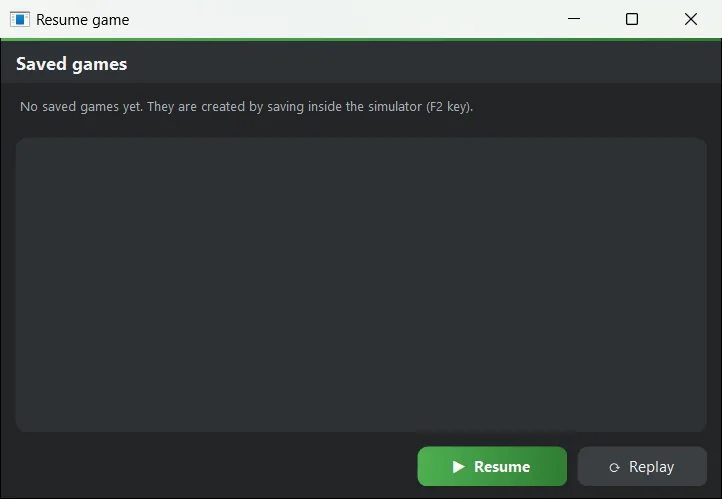
4.6 Resume and About
5. Companies: concepts and access
The Companies tab is optional and needs internet. Every service you drive for your company is recorded automatically when you return from the simulator:
- the distance, measured live;
- the real driving time;
- the passengers;
- its economics (income, track access charge, energy, salary and rental).
5.1 What each role can do
| Section / action | Driver | Supervisor | Manager |
|---|---|---|---|
| Services (see all of them, details of each one) | ✔ | ✔ | ✔ |
| Fleet (see units, status, details and 3D) | ✔ | ✔ | ✔ |
| Fleet: Send to workshop · Assign number plate · Retire | — | ✔ | ✔ |
| Purchase (buy and rent locomotives) and «Buy this train» | — | ✔ | ✔ |
| Bank (summary and transactions) | ✔ | ✔ | ✔ |
| Ranking and My profile | ✔ | ✔ | ✔ |
| Members: see, accept/reject requests, remove members | — | ✔ | ✔ |
| Members: add as Driver or Supervisor | — | ✔ | ✔ |
| Members: appoint Manager and change roles | — | — | ✔ |
| Station announcements (if the administrator has enabled them) | — | ✔ | ✔ |
| Change the company logo and name | — | ✔ | ✔ |
| Go on duty and drive for the company | ✔ | ✔ | ✔ |
| Hear the station announcements while driving (being a member is enough) | ✔ | ✔ | ✔ |
The Settings, Review, Users and Administration sections belong to the service administrator (superadministrator) and are not shown to users. Nobody can remove the manager from their company, and each user can create at most 3 companies of their own.
5.2 Create an account and sign in
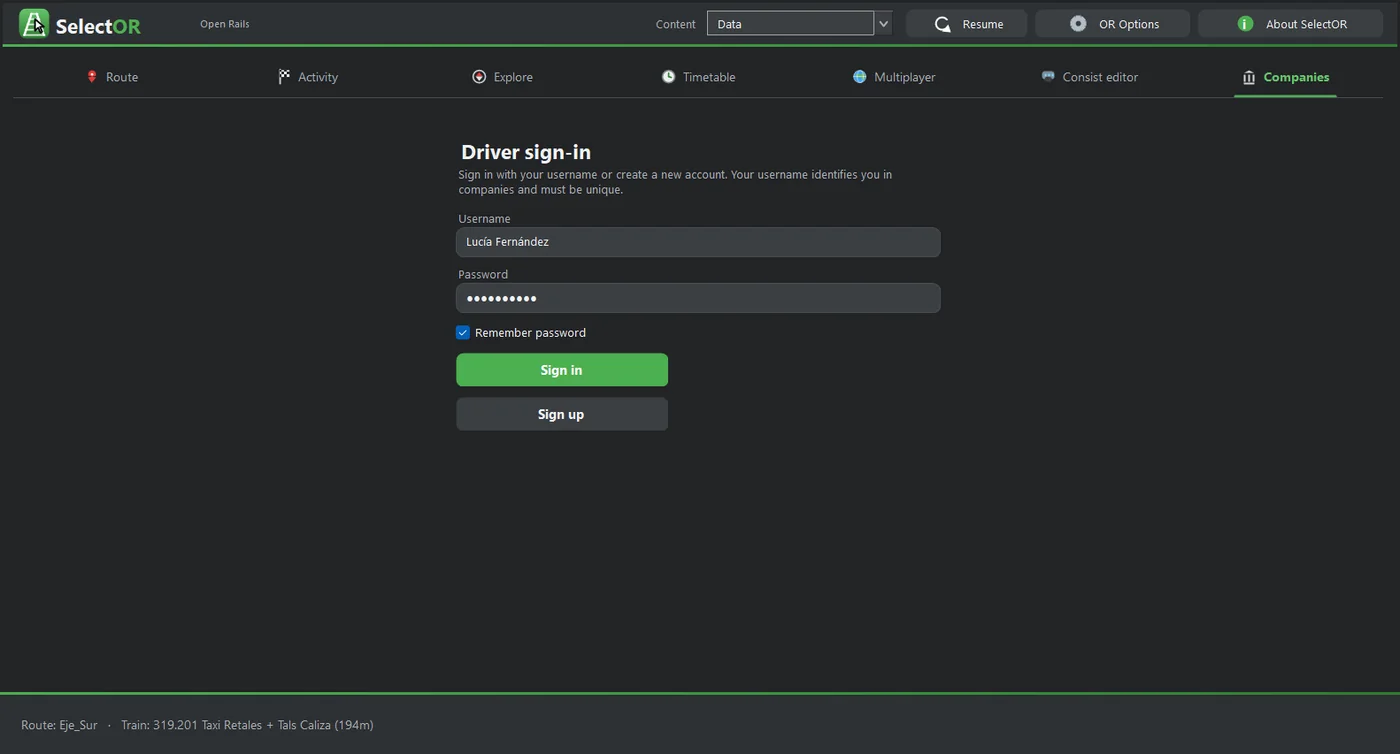
5.3 No company yet: create or join one
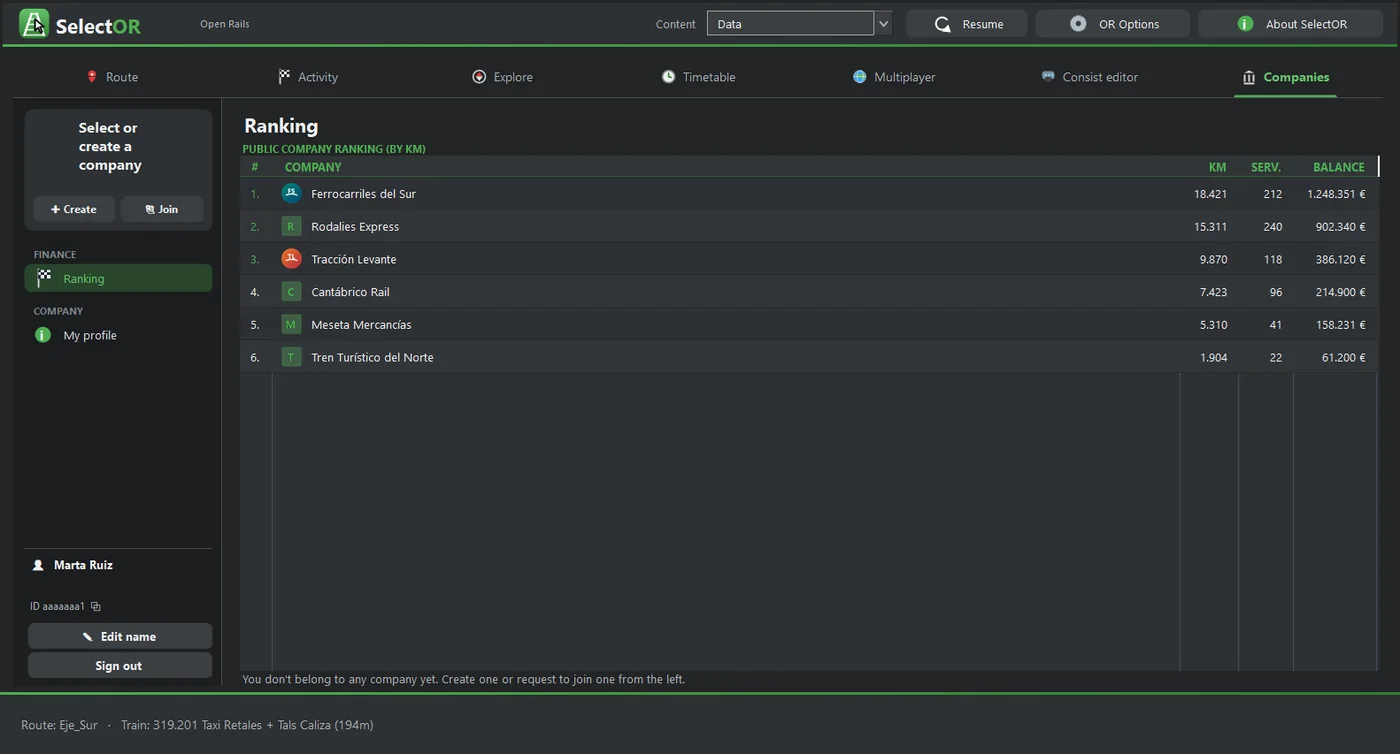
If you do not belong to any company yet, you will see the public ranking and the ➕ Create and 🙋 Join buttons:
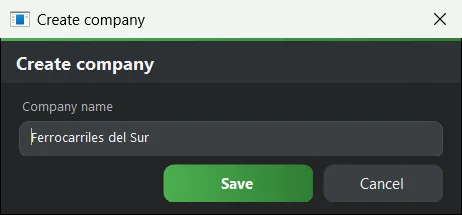
- Create: type the company name and save. You become the Manager and the company starts with the initial balance.
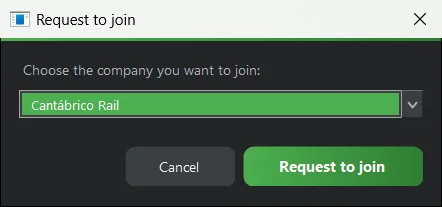
- Join: choose the company in the list and press Request to join. A supervisor or the manager will accept it from Members.
5.4 What a company screen looks like
- Company card (top left):
- the logo: supervisors and the manager change it by clicking it;
- the name, with ✎ to rename the company;
- the ☆/★ favourite company star, if you belong to several: it is the one selected when Companies opens;
- your role and the number of members;
- the drop-down list to switch company.
- Section menu: OPERATIONS (Services, Fleet, Purchase), FINANCE (Bank, Ranking) and COMPANY (Members, Station announcements, My profile). Only the ones your role can use are shown.
- Footer: your name, your ID (click to copy it; it is used to add you as a member), Edit name and Sign out.
- Indicator strip: the company's TREASURY, MEMBERS, SERVICES and TOTAL KM.
- The data are reloaded when each section opens and are updated live when another member makes changes.
6. Driver tutorial
Driver This chapter follows Lucía, a driver of «Ferrocarriles del Sur», from the moment she opens Companies until she records her service.
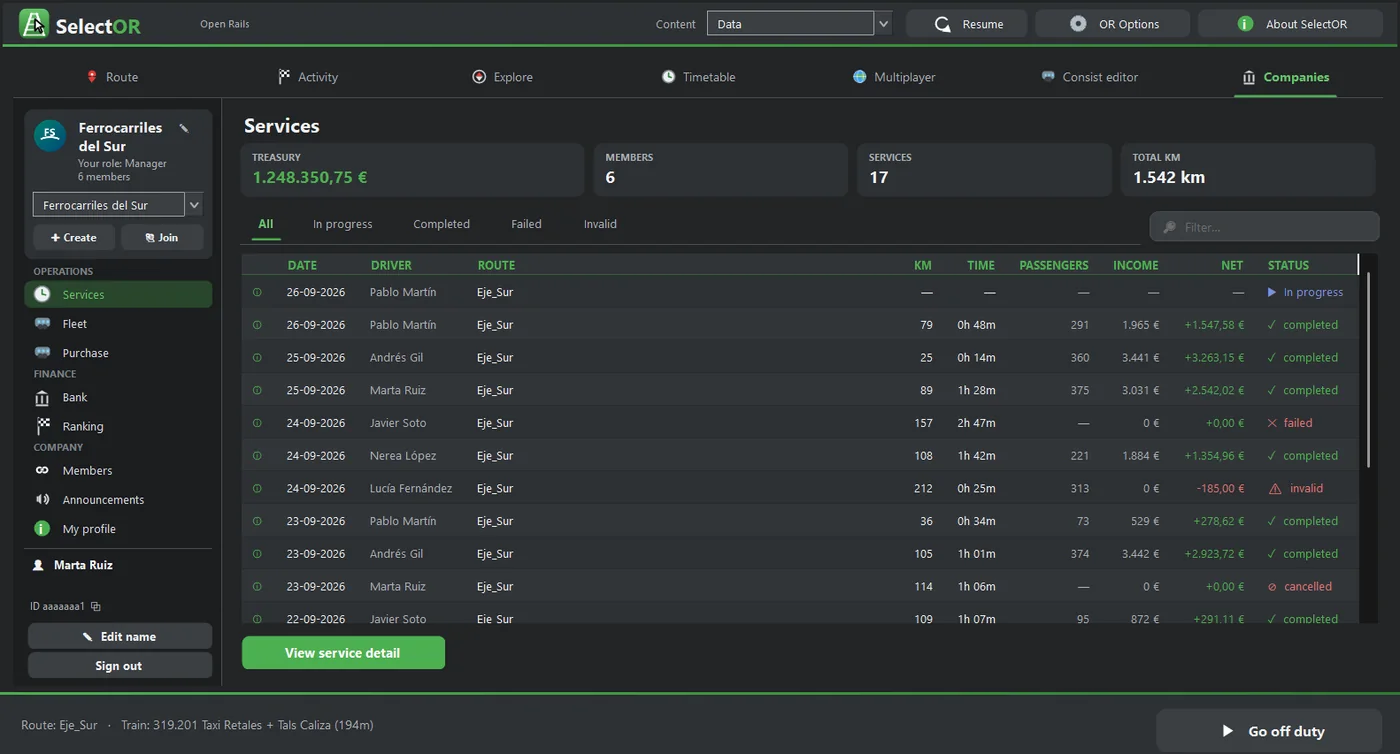
6.1 Services
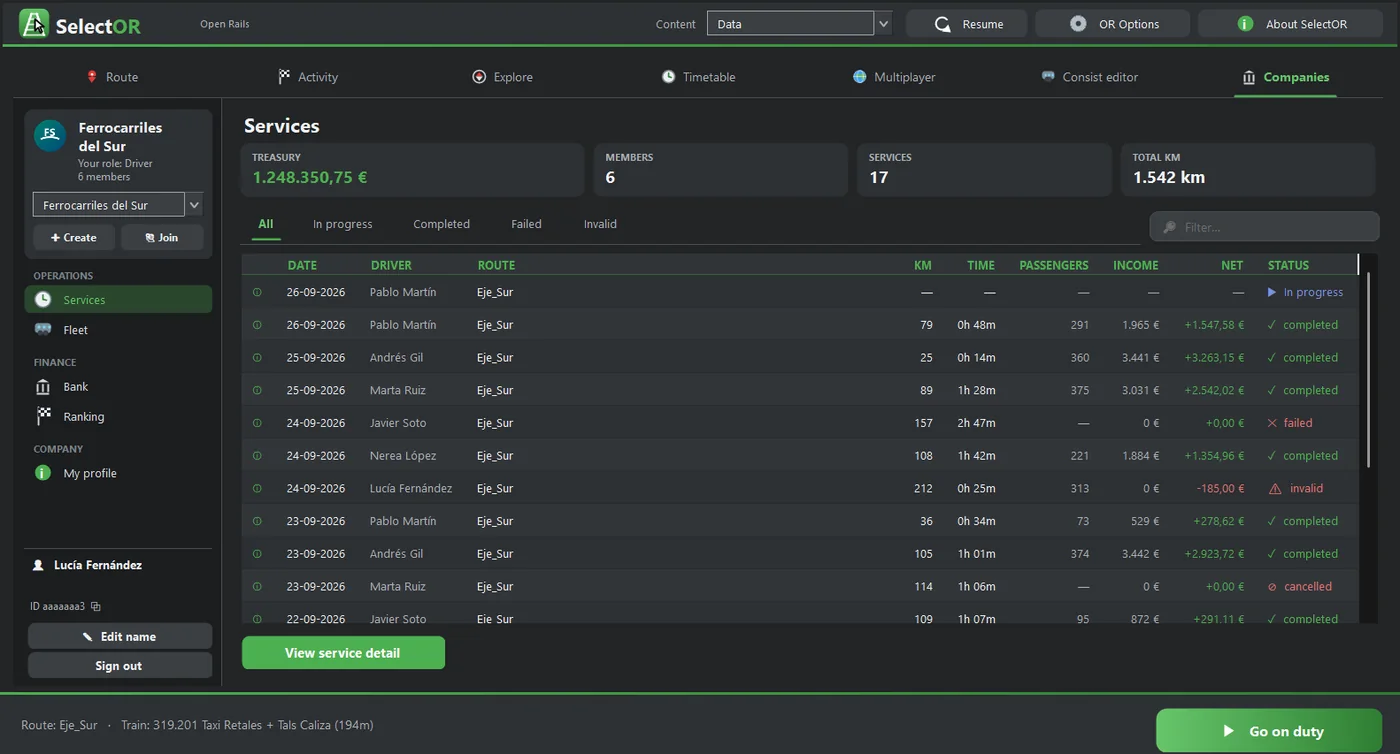
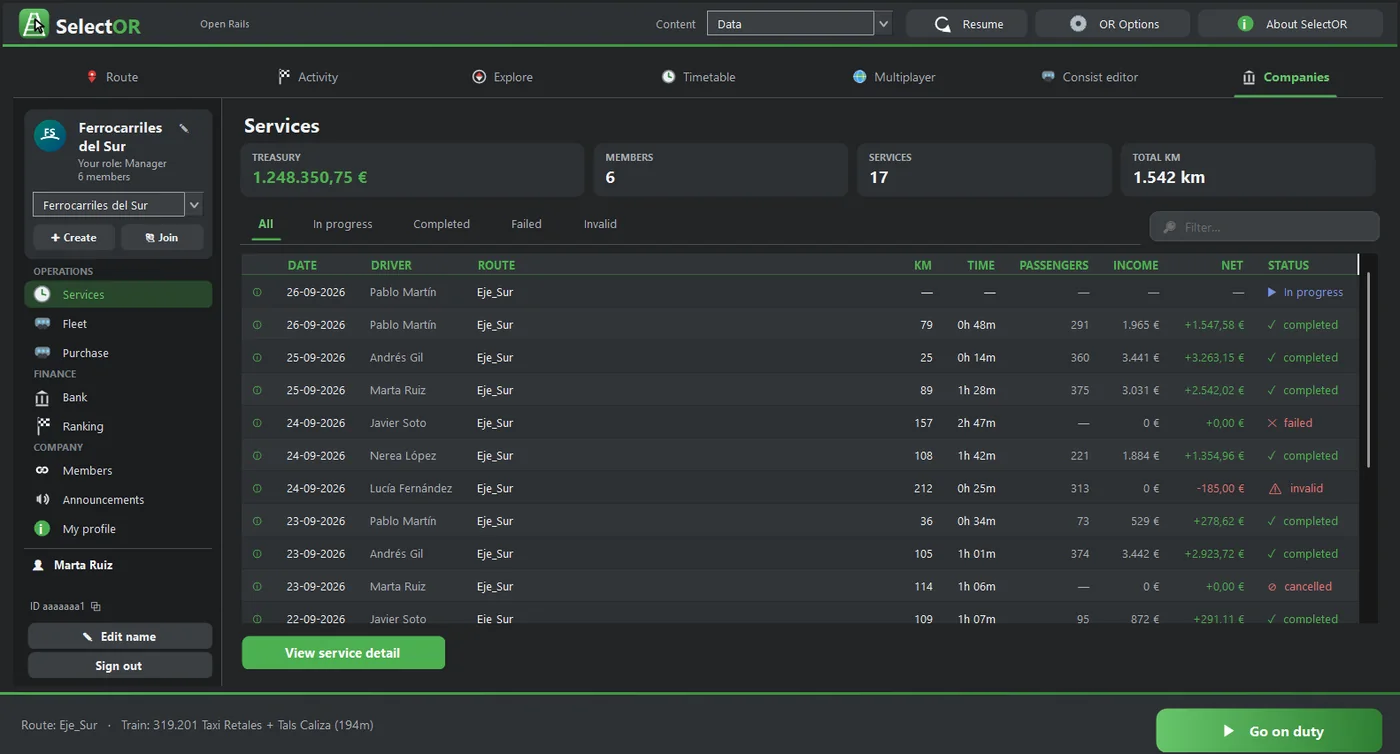
This is the list of all the company's services: date, driver, route, km, time, passengers, income, net and status. The tabs filter by All, Driving, Completed, Failed and Invalid, and the search box filters by text. View service details, or a double-click, opens its full record with the economic breakdown.
| Status | Meaning |
|---|---|
| ▶ Driving | The driver is driving it right now. Its figures show as «—» until it is recorded. |
| ✓ completed | Recorded and paid. |
| ✕ failed / ⊘ cancelled | The service was not completed. |
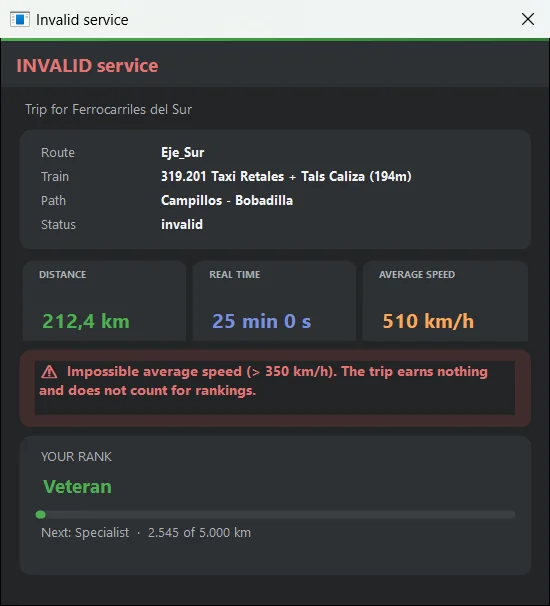
| ⚠ invalid | Impossible average speed (over 350 km/h): it earns no income and does not count for rankings. |
6.2 Fleet
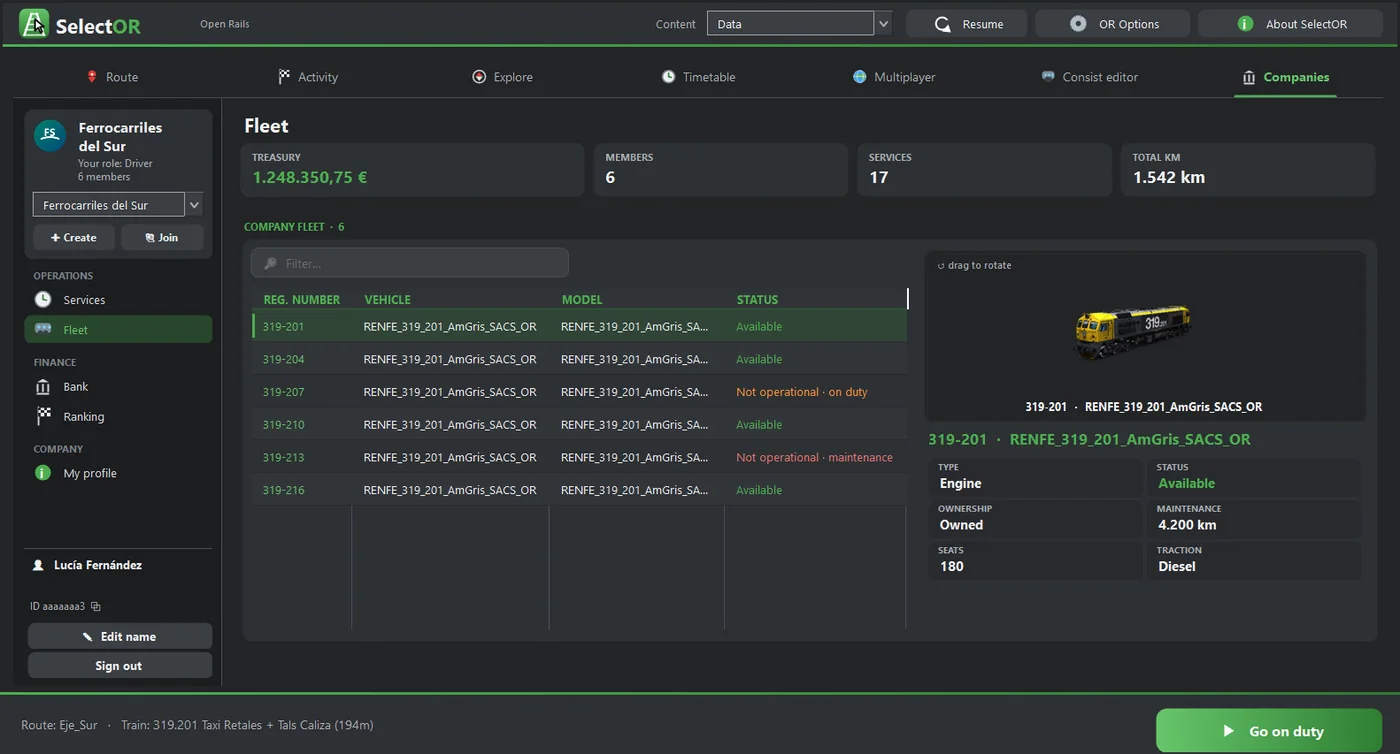
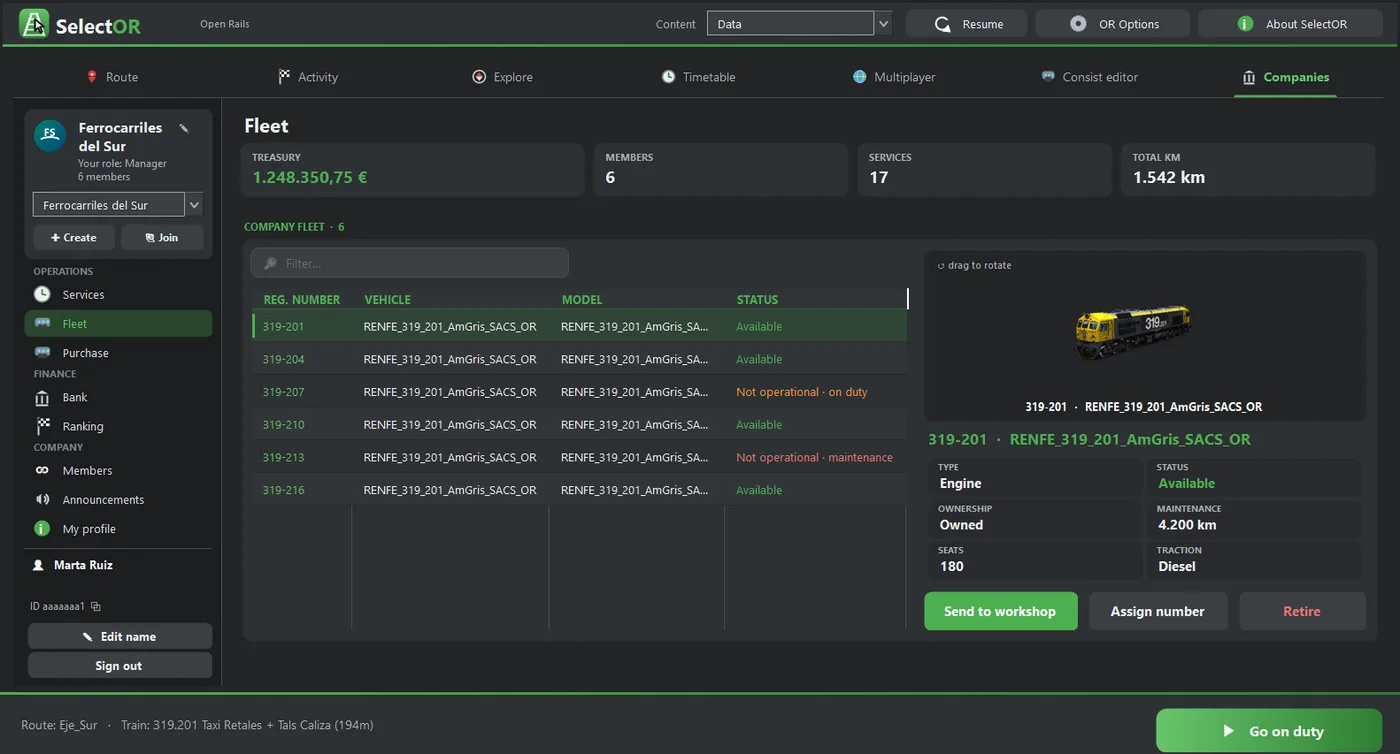
This is the list of the company's units: number plate, vehicle, model and status. When you pick one, you see it in 3D with its details: type, status, ownership (bought or rented), km left until maintenance, seats and traction.
- Available: you can set off with it.
- Not operational · in service: another driver is using it. Each unit lets one driver drive at a time.
- Not operational · maintenance: it has exceeded its km interval and a supervisor must send it to the workshop.
- Rows in grey are models that you do not have in your local content, so you cannot drive them.
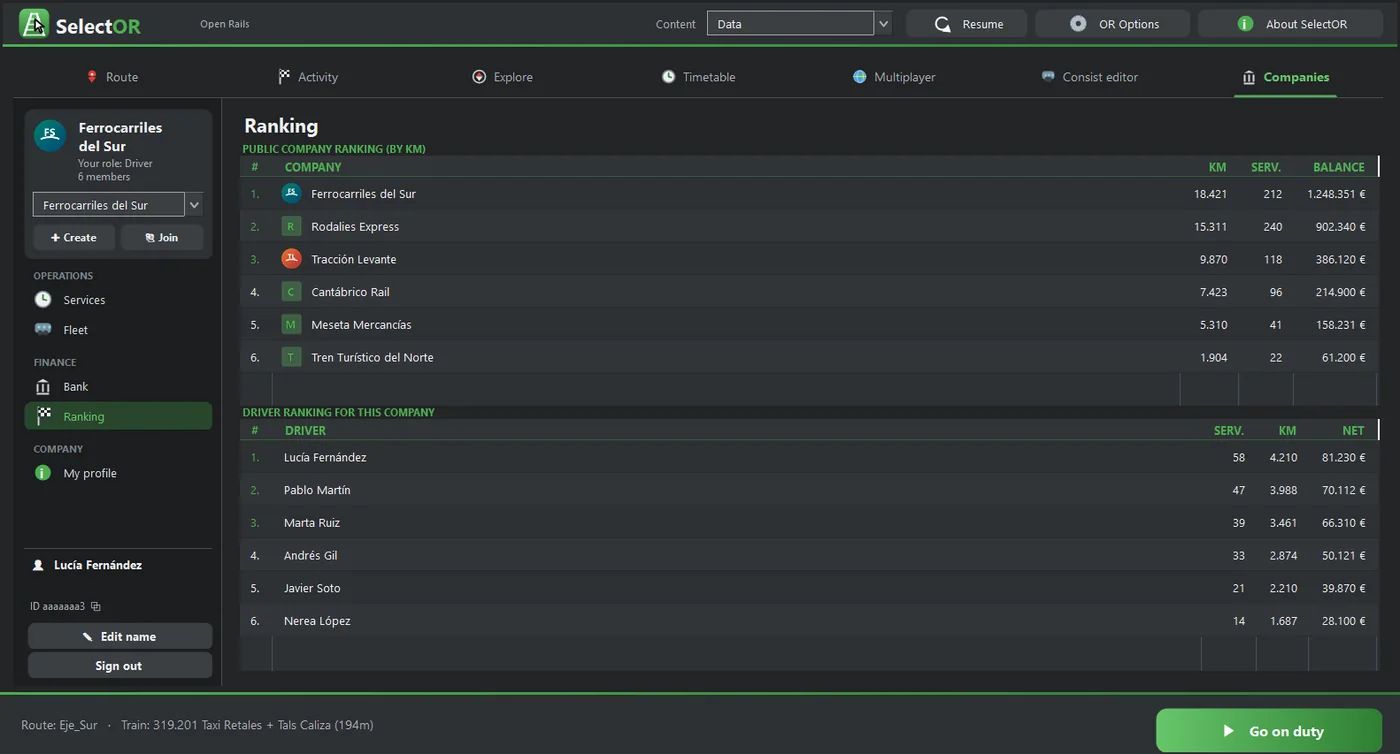
6.3 Bank, Ranking and My profile
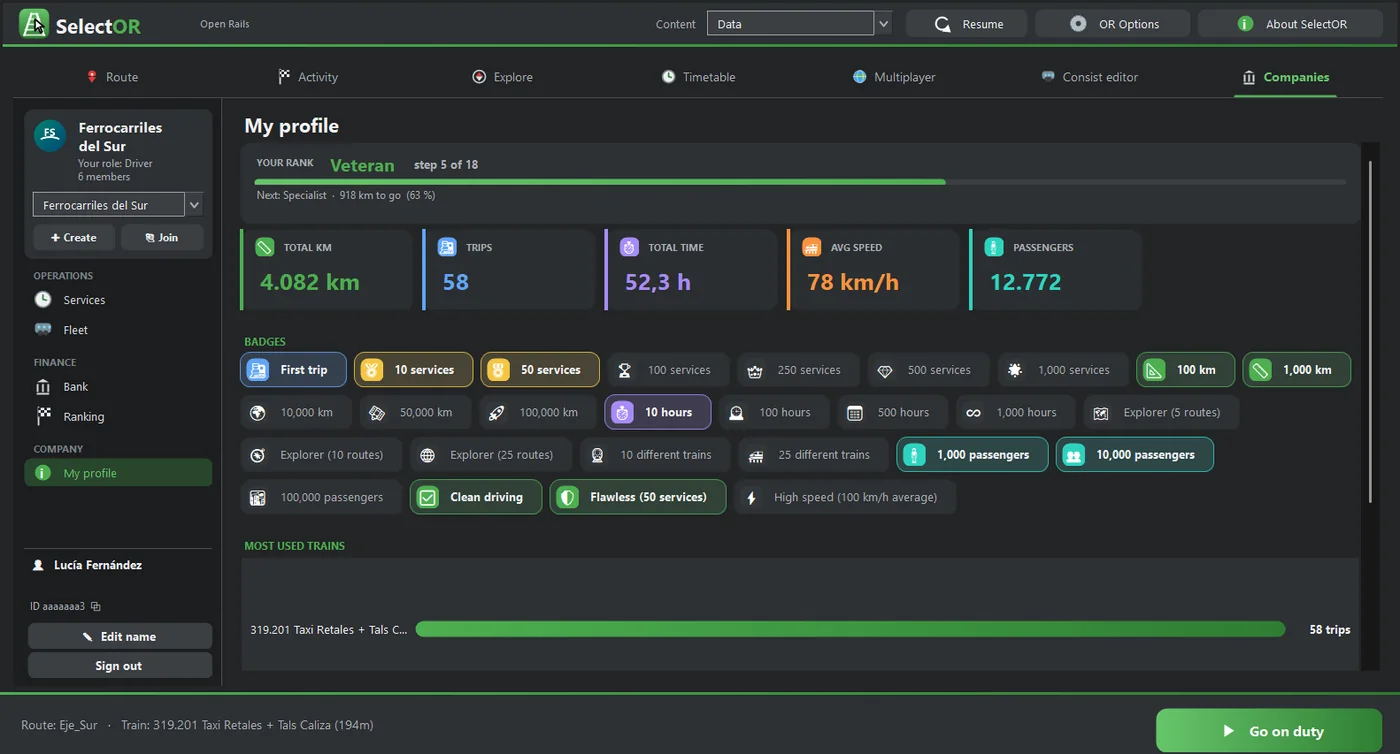
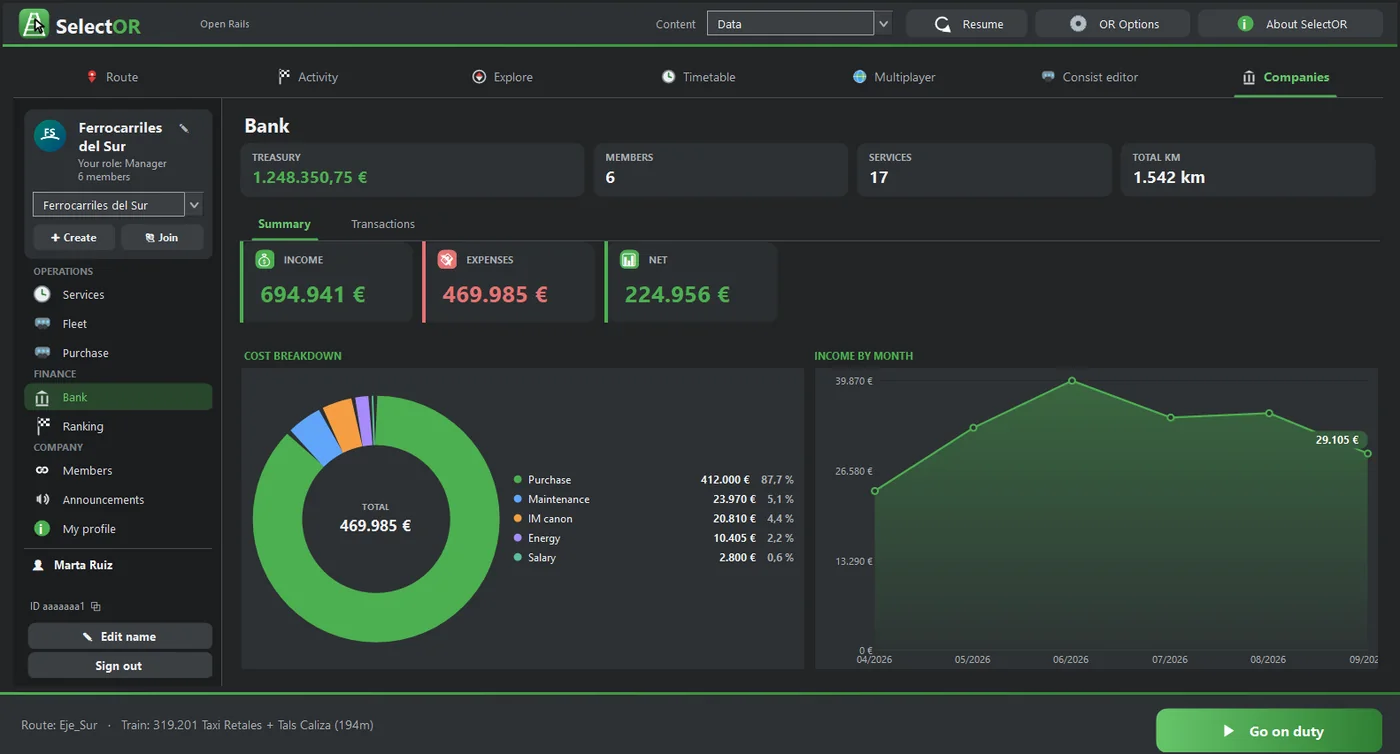
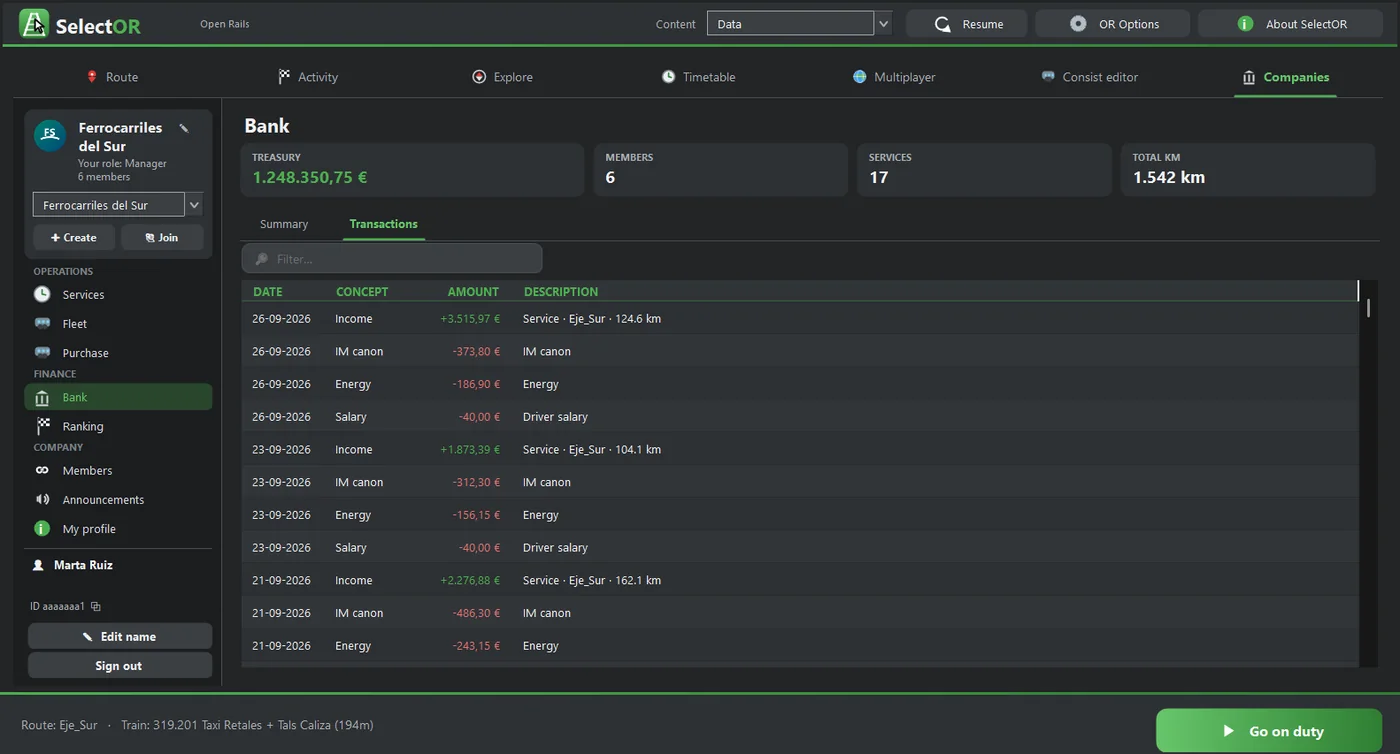
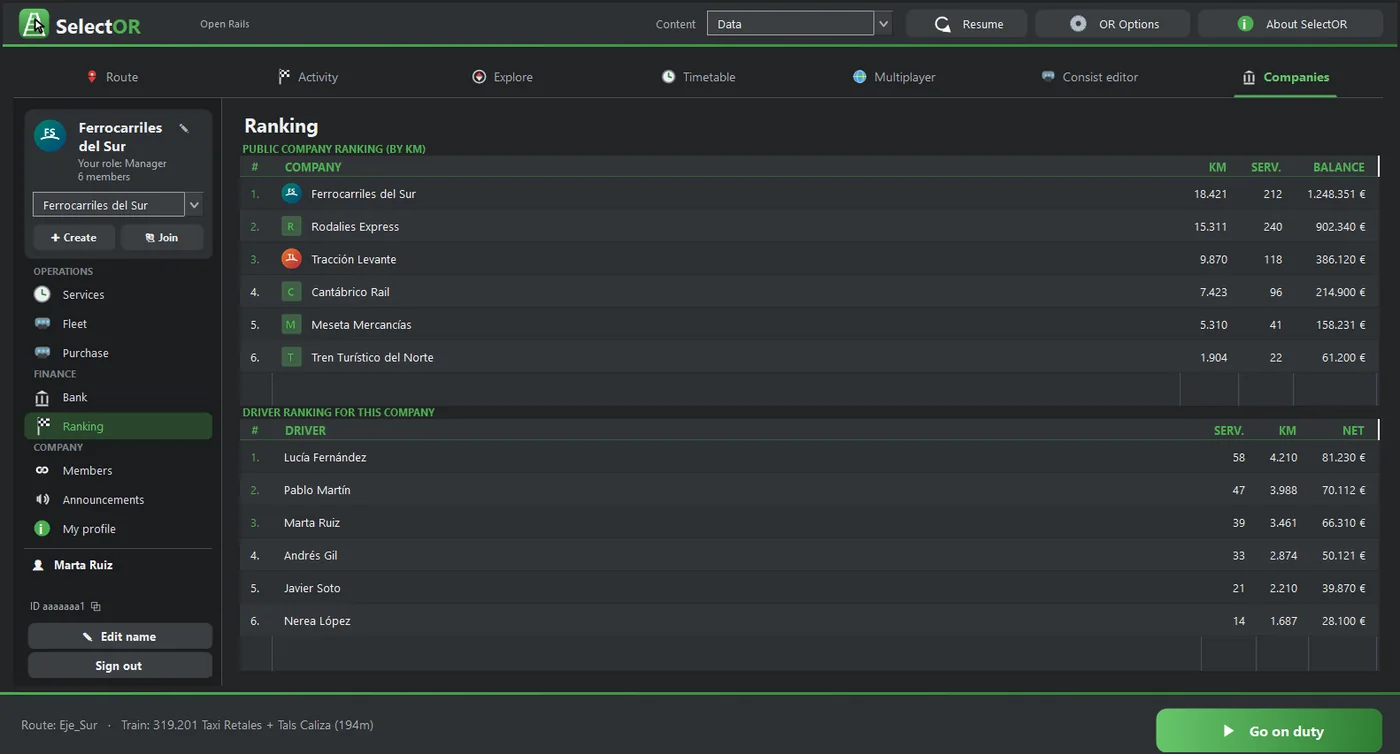
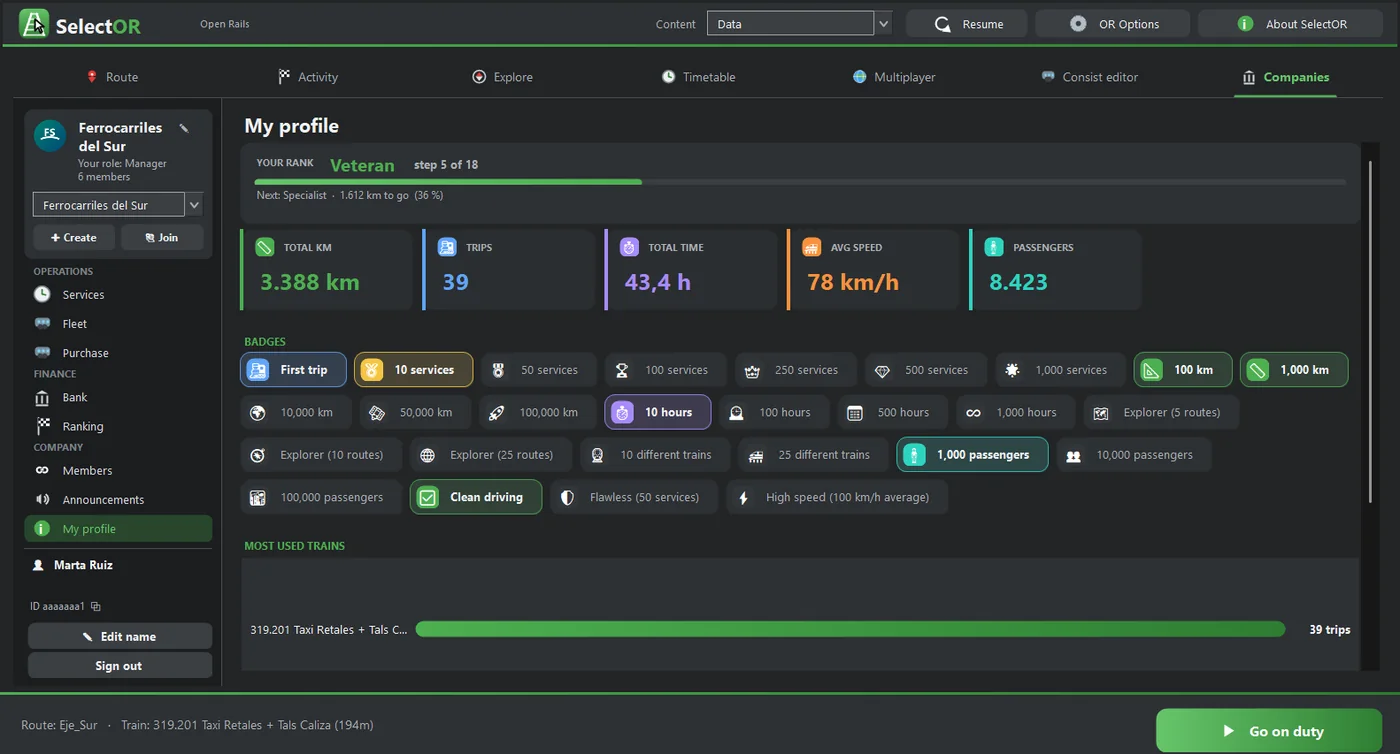
Bank shows all members the company accounts: income, expenses, net, cost breakdown and monthly income. Transactions lists every entry. Ranking compares companies by km and the drivers of your company with each other. My profile sums up your career: rank, kilometres, trips, time, average speed, passengers, badges, most used trains and most repeated journeys. Only completed and valid services count.
6.4 Driving a service step by step
- the locomotive is not in the fleet;
- the unit is busy;
- the unit is due for the workshop.
6.5 The service result
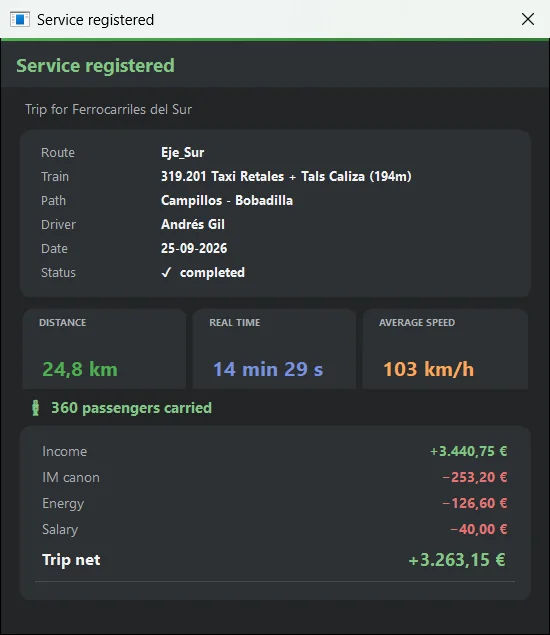
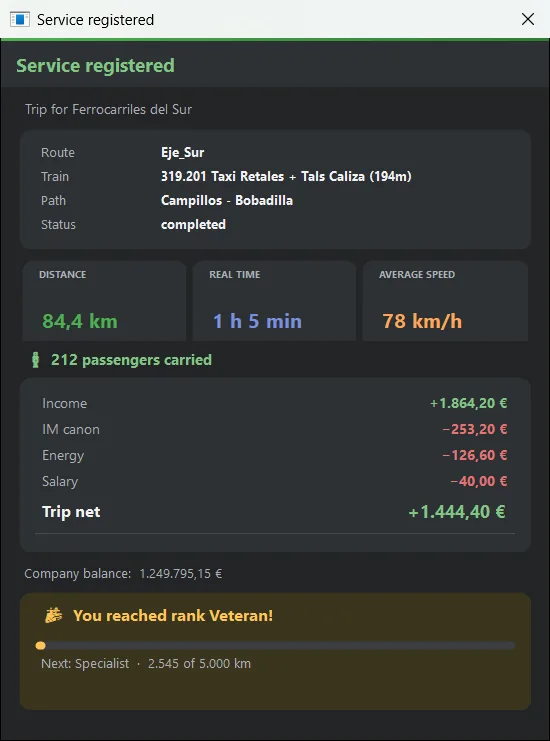
Once recorded, the Service recorded window appears, with:
- the route, the train and the path;
- the distance, the real time and the average speed;
- the passengers carried;
- the trip economics: income, track access charge, energy, salary, unit rental and net;
- the new company balance;
- your rank, with a notice if you have moved up a level.
- Trips shorter than 3 km or with less than 5 minutes of driving are not recorded: the service is discarded and the unit is freed.
- An average speed of more than 350 km/h marks the trip as invalid: it earns nothing and does not count for rankings. The server decides this with its own clock.
- At most 5,000 km per service, and the duration cannot exceed the real time elapsed.
- If recording fails (for example, with no internet), the blue Register service button remains so you can retry.
The income is calculated as follows:
- with passengers: passengers × fare. The fare rises with the train's comfort and with the average speed;
- without passengers: km × rate per km, adjusted by the train's capacity.
The expenses are:
- the track access charge paid to the infrastructure manager and the energy, per km;
- the driver's salary, per service;
- the rental, if the unit is rented;
- the workshop, when maintenance is due.
The rates are set by the service administrator.
7. Supervisor tutorial
Supervisor The supervisor drives like any driver (chapter 6) and also looks after the company: admits members, buys and rents trains, maintains the fleet and records the station announcements.
7.1 Members
The Members section has three tabs:
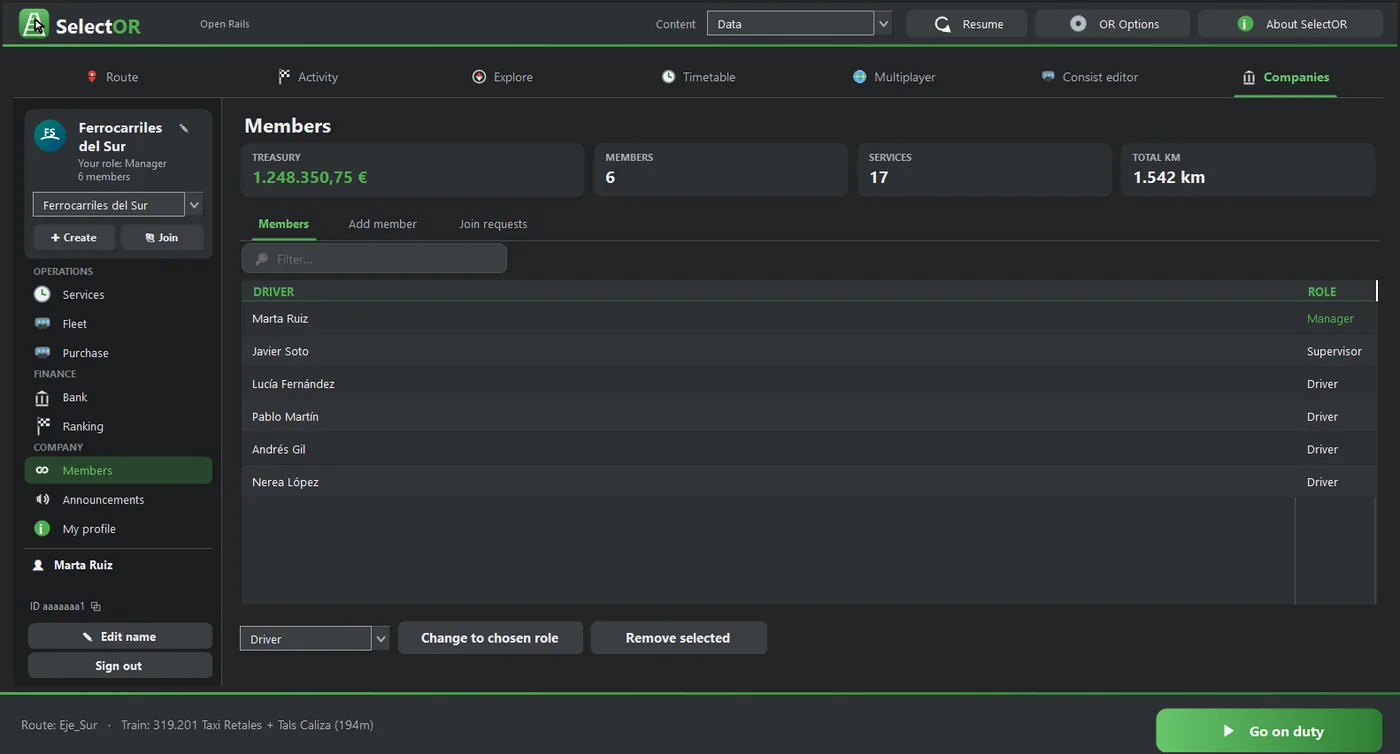
- Members: list of drivers and their role. Remove selected expels a member, but never the manager.
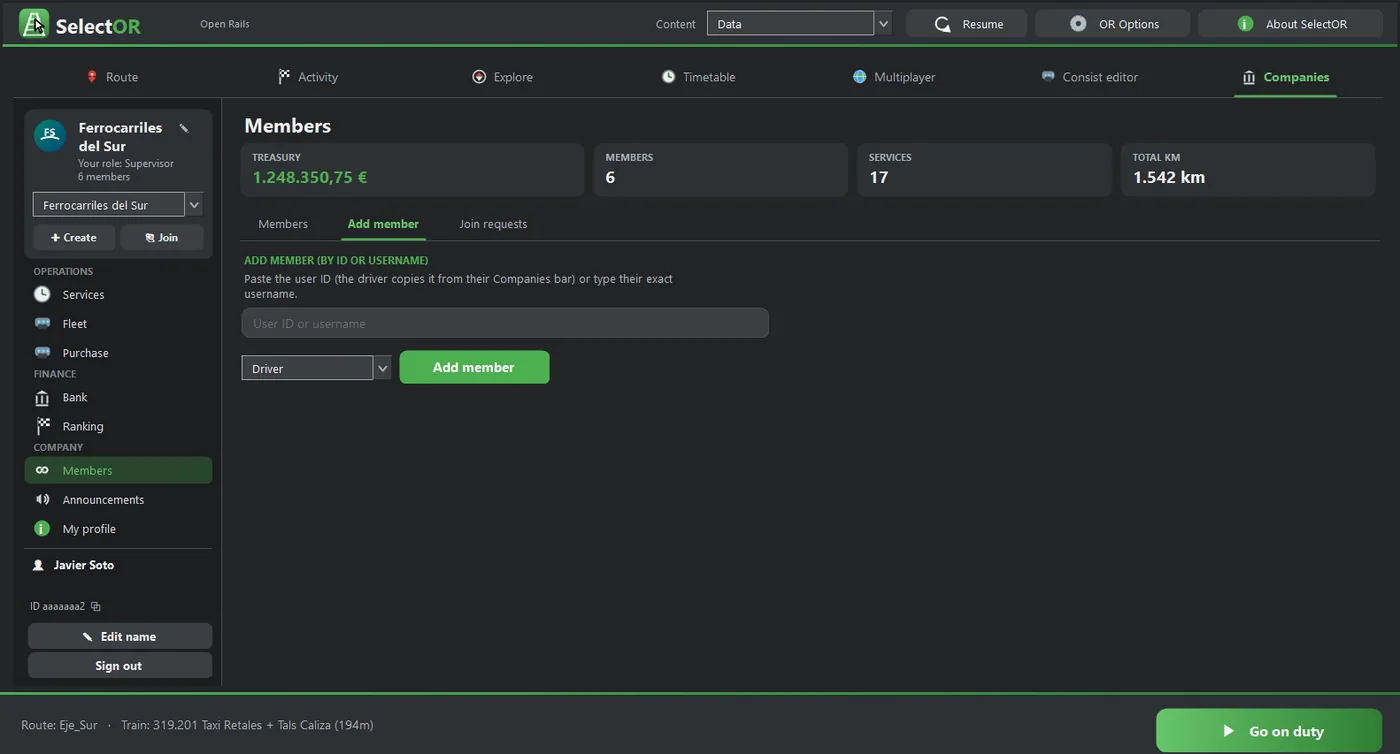
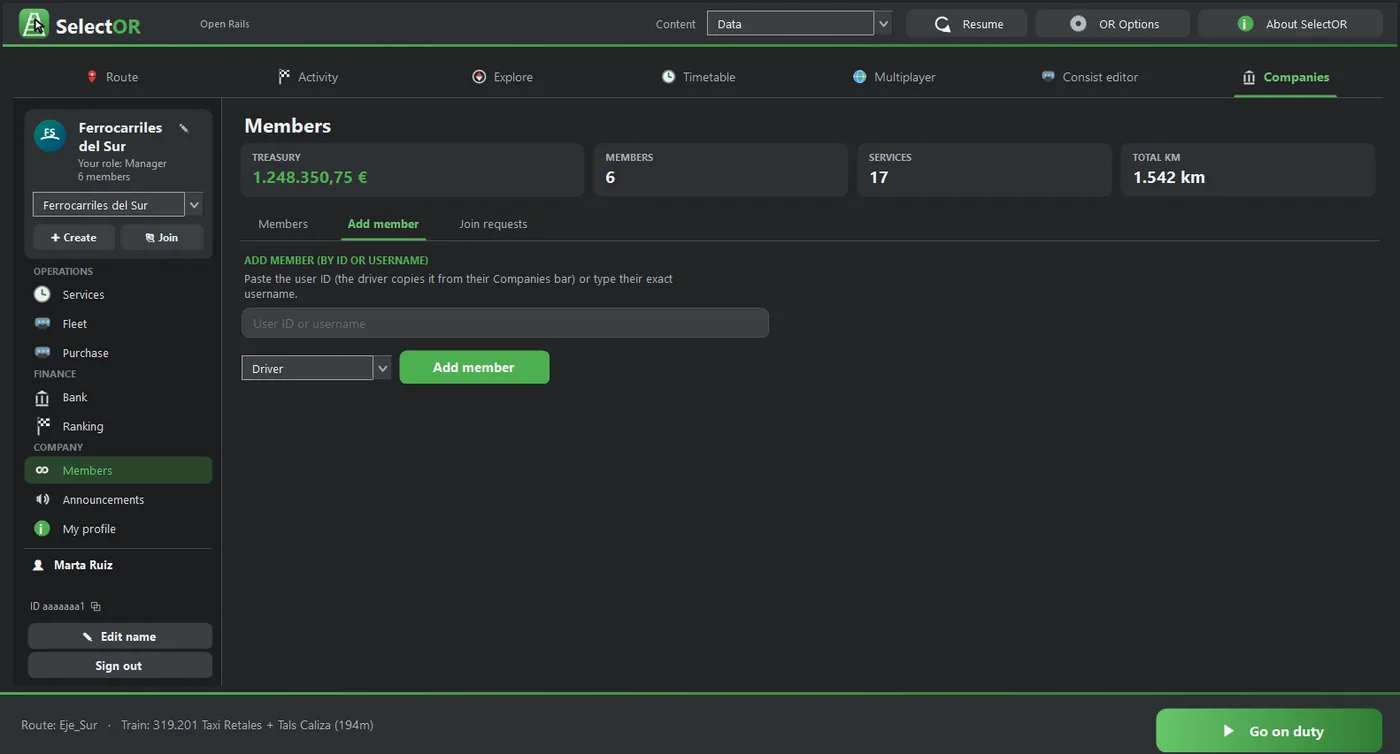
- Add member: paste the driver's user ID (they copy it from the footer of their Companies menu) or their exact username. Choose the role and press Add member. A supervisor can add members as Driver or Supervisor.
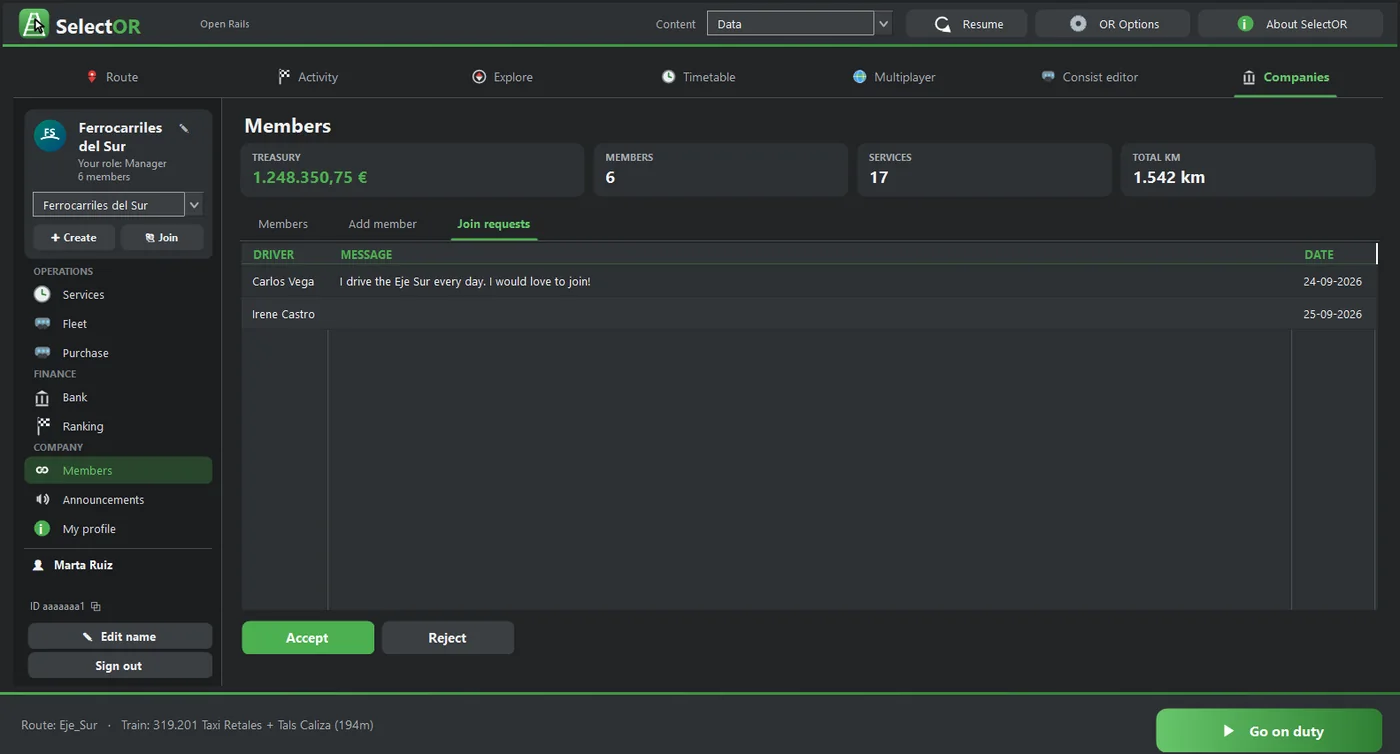
- Join requests: requests made with «Join». Accept turns them into drivers and Reject discards them.
7.2 Buying trains
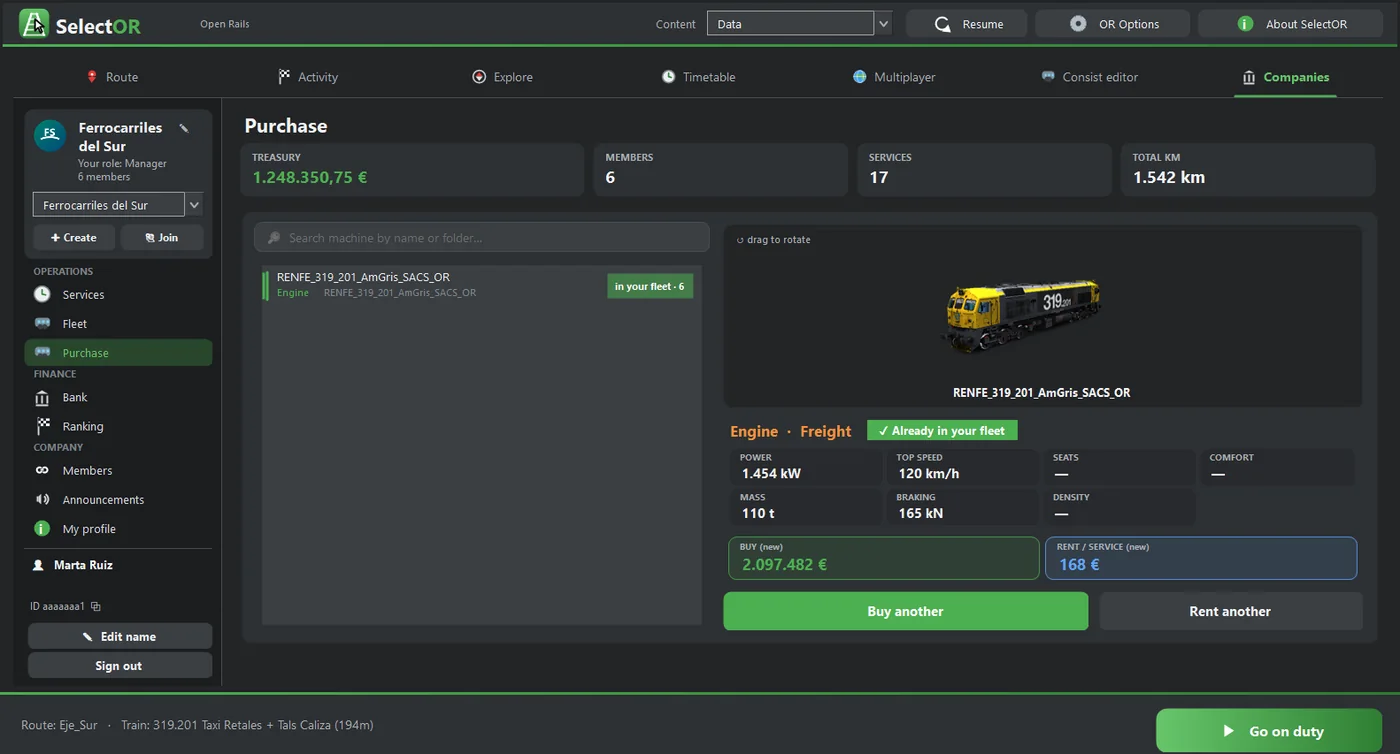
Purchase lists the locomotives in your content, grouped by model. The search box filters by name or folder, and the «in your fleet · N» label shows how many units you already have. When you pick a locomotive you see it in 3D, its data (power, top speed, seats, comfort, mass, brakes and density) and two prices: PURCHASE and RENTAL / SERV.
- Buy: you pay its value once and the unit belongs to the company.
- Rent: the company pays a rental fee for every service made with that unit.
- Before buying, you choose which consist the price is based on: what enters the fleet is the locomotive, but the more cars and mass the train hauls, the more it costs.
- Each unit lets one driver at a time drive. For two drivers to set off with the same model at the same time, you need two units (Buy another).
- Multiple units and other fixed formations are bought whole, as one unit.
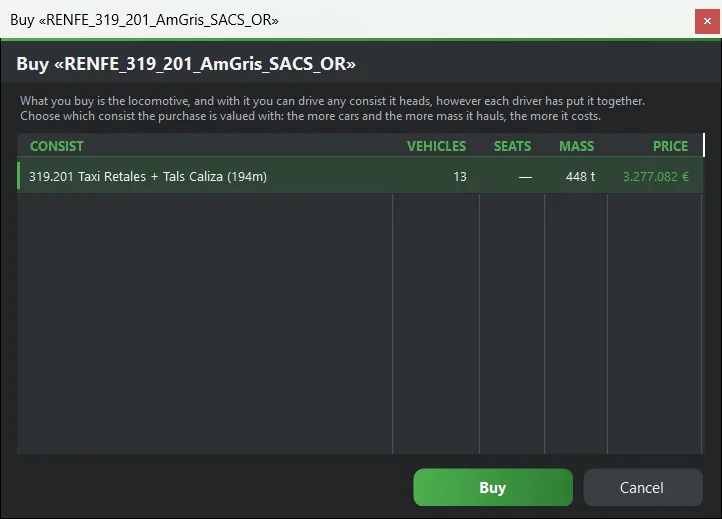
From Explore or Timetable, the Buy this train button opens Purchase with that train's leading locomotive already selected.
7.3 Looking after the fleet
- Send to workshop: carries out the maintenance and returns the unit to «Available». It costs money and must be done when the unit exceeds its km interval.
- Assign number plate: a text of up to 20 characters, for example «446-140». Leaving it empty removes it.
- Retire: an owned unit is sold and part of its value is refunded; a rented one is returned.
7.4 Station announcements
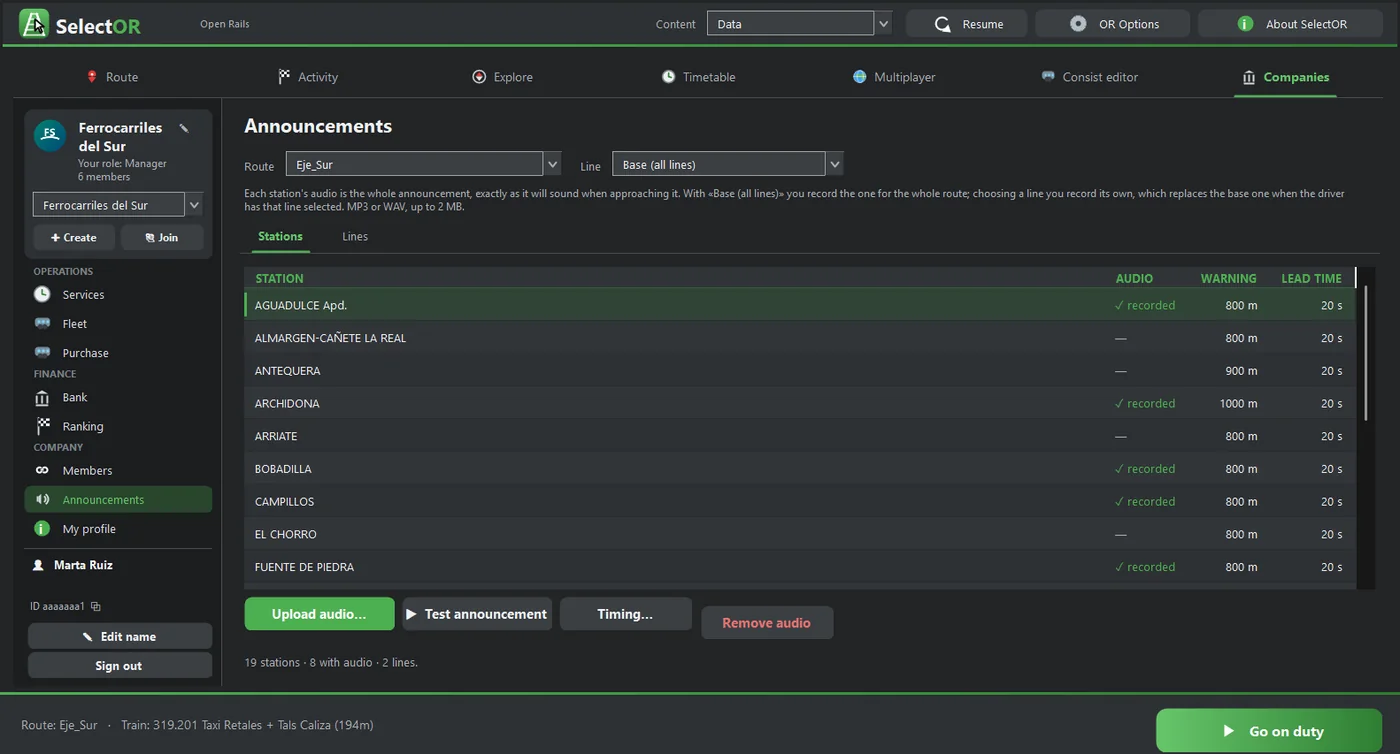
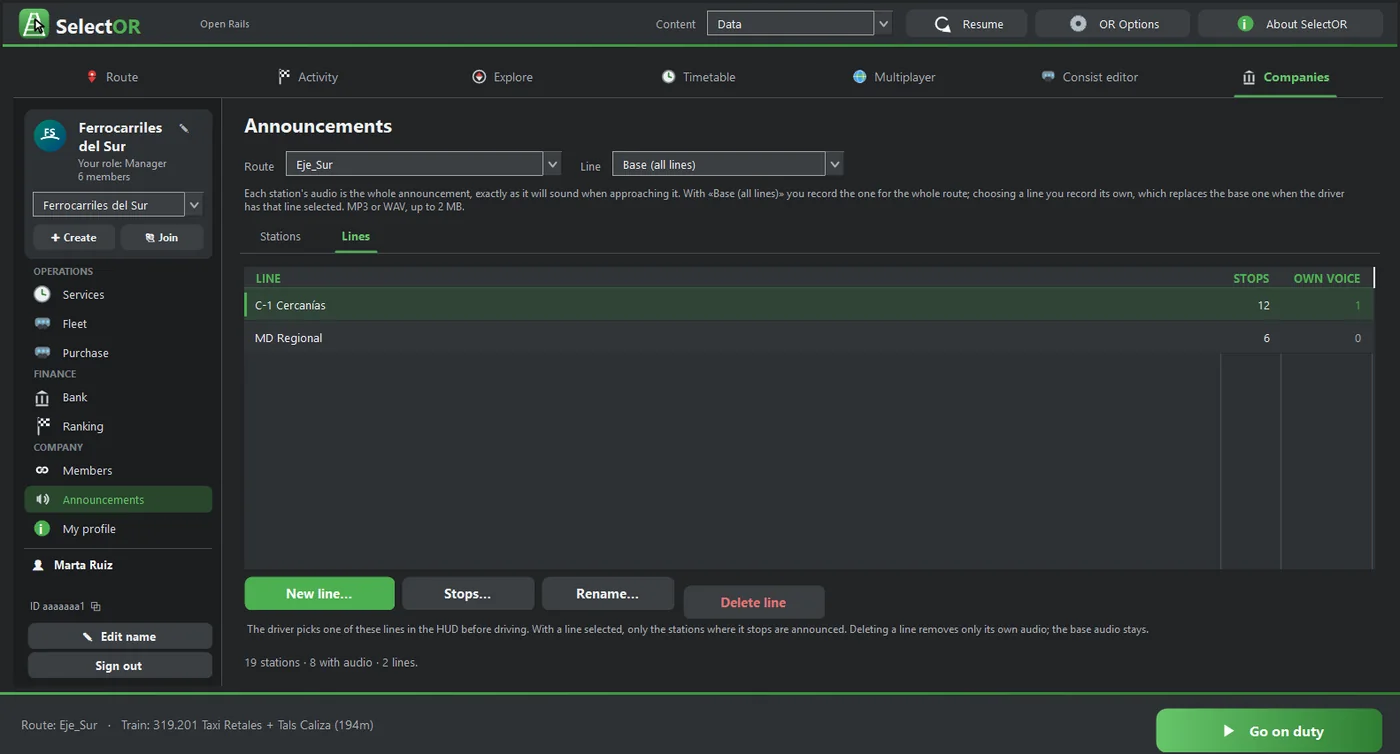
If the administrator has enabled station announcements for your company, the supervisor and the manager record the station announcements that drivers will hear as they approach each stop. First choose the Route and the Line: Base (all lines) or a specific line.
Stations tab
- Upload audio…: uploads an MP3 or WAV of up to 2 MB with the whole announcement. With «Base» it applies to the whole route; with a line selected, it replaces the base one when the driver is running that line.
- Test announcement: plays it.
- Lead time…: when it plays, in «metres seconds» format (for example, «800 20»). It plays 800 m or 20 s before the station at the train's current speed, whichever comes first. With a line selected, the lead time applies only to that line at that station (it is marked «·L»); leaving it empty goes back to the station's value.
- Remove audio: deletes the audio.
Lines tab
- Create, rename and delete lines.
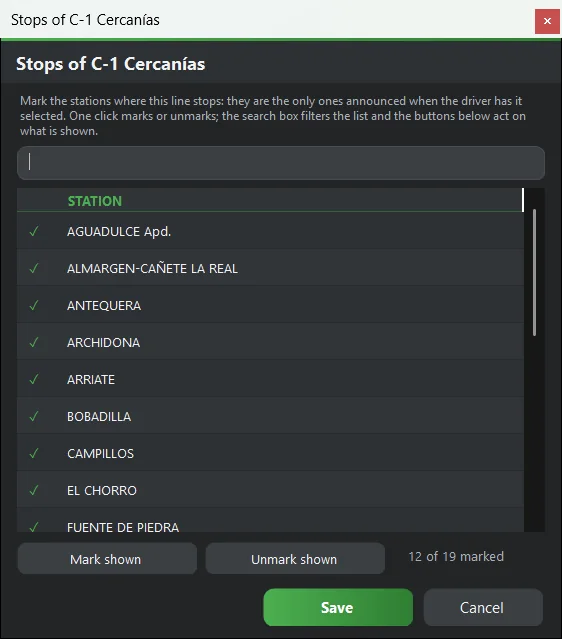
- With Stops… mark which stations each line stops at: only those will be announced.
The announcement only plays if the station is ahead of the train, in its direction of travel. So stations on parallel tracks and the departure station do not play.
7.5 Bank
8. Manager tutorial
Manager The manager is whoever creates the company. They can do everything a supervisor (chapter 7) and a driver (chapter 6) can, and they are the only one who assigns the roles.
8.1 Setting up the company
8.2 Assigning roles
In Members → Members, choose a member and the new role (Driver, Supervisor or Manager) and press Change to selected role. You cannot change your own role. When adding members, the manager can also give them the Manager role.
8.3 Keeping track of the company
Keep an eye on the Treasury in the top strip and on the Bank section. Services earn from passengers or kilometres and pay track access charges, energy and salaries. Purchases, rentals and workshop visits also cost money. In Ranking, compare your company with the others by km and see which drivers contribute the most. If you belong to several companies, mark your favourite with ★.
9. Tools while driving
Everything in this chapter depends on the Open Rails web server on port 2150. Without it, these tools do not appear.
The tools appear once the scenario has loaded. They do not take the keyboard away from the simulator and they remember where you left them. They work on company duty and also in free driving: Activity, Explore and Timetable.
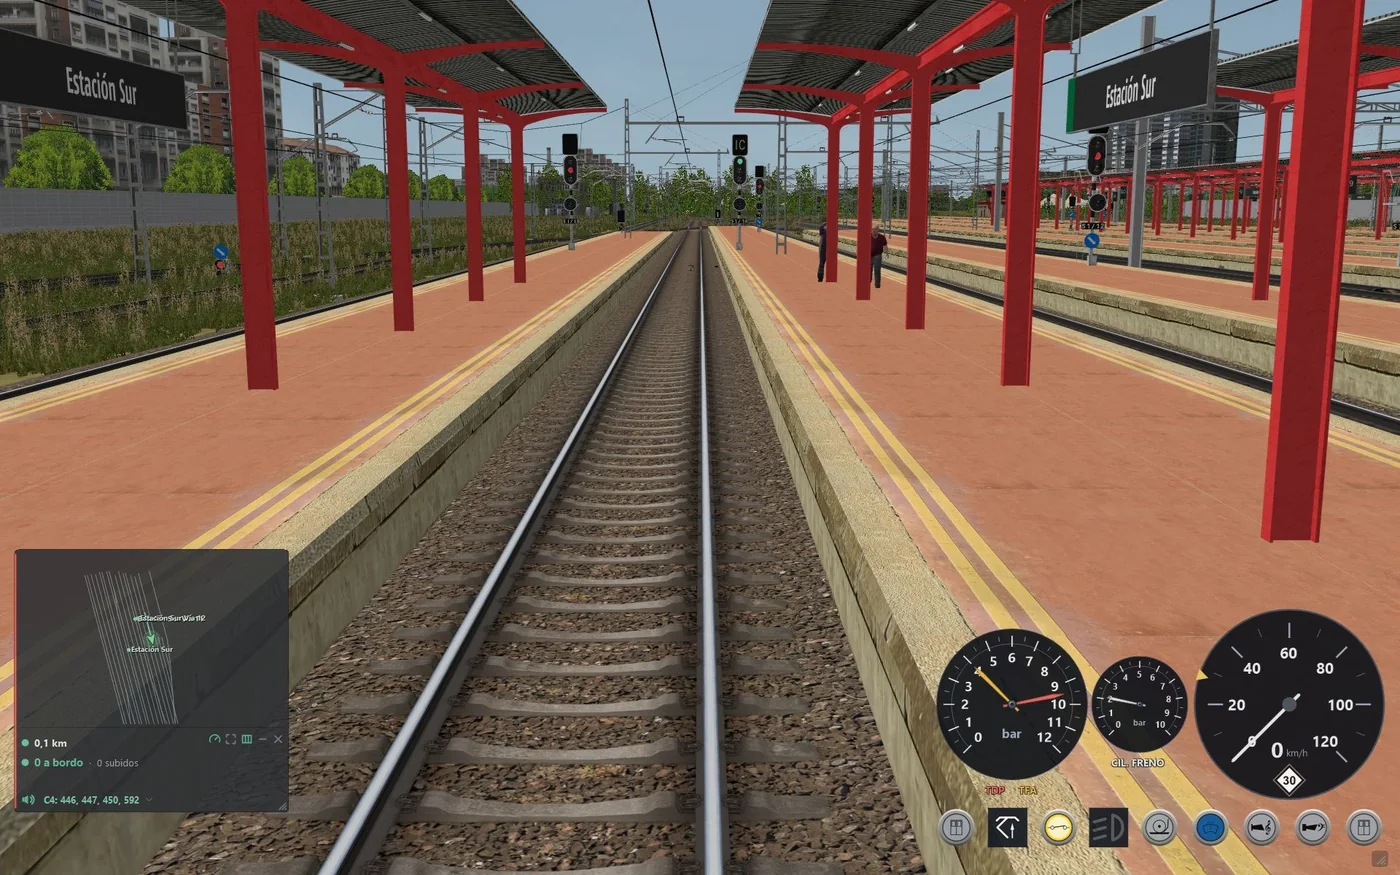
9.1 HUD and mini-map
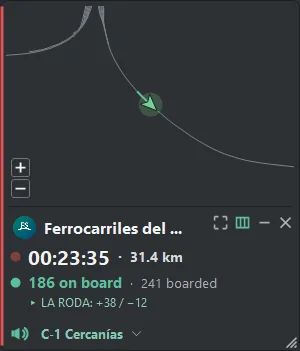
By default it sits at the bottom left, and you can drag it anywhere. It shows:
- Mini-map:
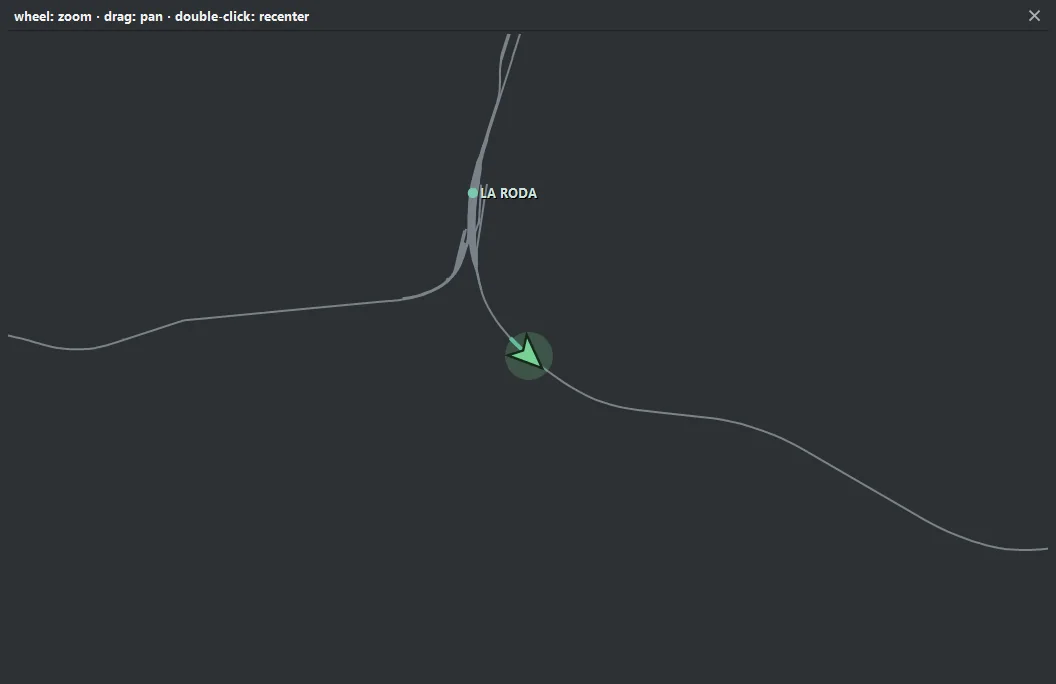
- the track, the stations and your train (a green arrow pointing in the direction of travel);
- the zoom changes with the mouse wheel or with the + / − buttons that appear when you hover over it. It is kept for your next drives;
- it grows by dragging its bottom-right corner.
- Company and timer (on duty): logo, name, a red light, elapsed time and km travelled. In free driving, only the km.
- Passengers (passenger trains): «N on board · N boarded» and, after each stop, how many got on and off.
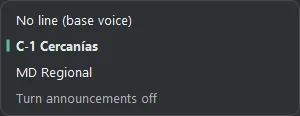
- Station announcements:
- a click on the speaker turns them on or off (crossed out in red = off);
- a click on the line name opens the list to choose it;
- the mouse wheel over that row adjusts the volume.
- Icons: cab panel, large map, mini-map, collapse and close. Once closed, the HUD is reopened from the top bar.
9.2 Quick-access bar
It is hidden: move the mouse to the top edge of the screen, in the centre, and it slides down. It contains:
- the status: «On duty · company · time · km» or «Free driving»;
- the HUD, Map and Cab panel buttons, to show or hide each tool;
- the service button:
- Go on duty · <company>: puts you on duty in the middle of a trip (also in Activity) if the train belongs to the fleet;
- Register service: press it twice to record the service without closing Open Rails;
- if it is not possible, it shows the reason (for example, «The train is not in the fleet of …»).


9.3 The cab panel
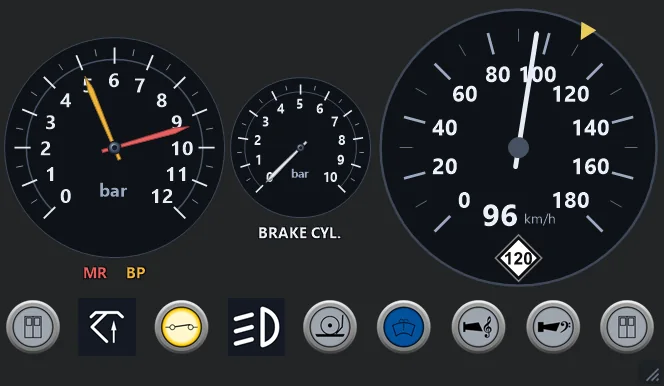
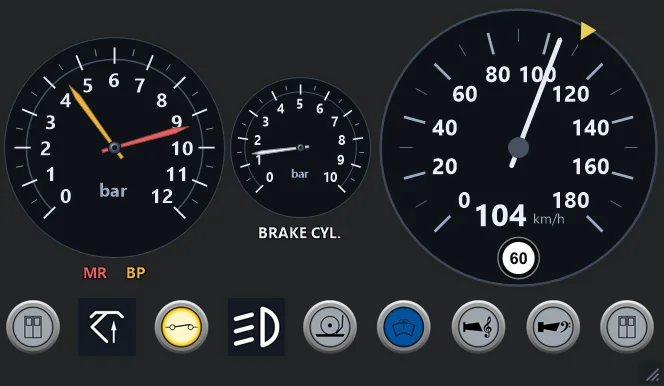
It is a frameless panel with the train's indicators. It is opened and closed with Cab panel in the top bar or from the HUD, and it remembers whether you left it open. You move it by dragging the dials and resize it with the handle in its corner or with the mouse wheel. At night in the simulator, the dials are backlit.
- Air gauge: TDP (main reservoir, red needle) and TFA (automatic brake pipe, amber needle), in bar.
- CIL. FRENO: brake cylinder pressure.
- Speedometer:
- the scale matches the train's top speed;
- the needle moves smoothly and there is a digital readout in km/h;
- the yellow triangle on the ring marks the Speed target (cruise control target speed) when the train has it active;
- underneath is the speed sign: a diamond with the current track limit. When you approach a lower limit and the braking curve begins, it changes to a circle with the next limit. The limits come from the Open Rails Track Monitor; those the Track Monitor shows in yellow are ignored.
- Row of controls, from left to right:
- left doors;
- pantograph;
- circuit breaker;
- headlights;
- sander;
- wipers;
- high horn (Bell) and low horn (Horn);
- right doors.
| Control | What it does when pressed |
|---|---|
| Left / right doors | Open or close the doors on that side. Only shown on passenger trains. |
| Pantograph | If any is raised, it lowers the raised ones; otherwise it raises the front one. Not shown on diesel or steam trains. |
| Circuit breaker | If it is closed it opens it, and if it is open it closes it. Hold the click if the locomotive needs it. |
| Headlights | Click goes up one step (off → dipped → main beam → off); right-click goes down one step. |
| Sander · Horns | They work while you hold the click. |
| Wipers | Turn on or off. |
If you ask for something the simulator does not allow, such as opening the doors while moving, the icon returns to its real state after a few seconds.
10. Troubleshooting
The HUD, the top bar and the cab panel do not appear when I drive
Check in OR Options → System that Web server port = 2150, and that no other program is using that port. Run Open Rails windowed or in borderless full screen: exclusive full screen covers the SelectOR windows. Remember that they appear once the scenario has loaded.
The timer does not move, or there are no passengers or announcements
It is the same case: the Open Rails web server is not answering on port 2150.
«The train is not in the fleet» or «Train not operational» when I go on duty
The leading locomotive does not belong to the company, or all its units are in service or due for the workshop. A supervisor can buy or rent another unit (Purchase) or send it to the workshop (Fleet). You can also choose another free livery of the same model.
My trip was not recorded
Trips shorter than 3 km or than 5 minutes are not recorded. If there was a connection error, press Register service (blue button) in Companies.
My service shows as «invalid»
The average speed exceeded 350 km/h, for example because the simulator time was sped up. Those trips earn nothing and do not count for rankings.
The station announcements do not play
Check that the train has passenger seats (freight trains and light engines have no announcements), that the company has announcements enabled and audio for that route, that the HUD speaker is not crossed out and that you have chosen a line (or the base voice) in the list. The station must be ahead in the direction of travel.
I cannot see routes or trains
Add your content folders in the Open Rails Options and choose the right set under Content. Press F5 to read the content again.
Text is cut off or the window is too large
SelectOR adapts to the screen size and to Windows scaling. If something still looks wrong, maximise the window and update to the latest version.
A train looks grey or incomplete in the 3D view
That model is missing textures or files in your installation. It is a content problem, not a SelectOR one.
11. Data, privacy and files
- Companies: the data of companies, trips, bank and members are stored in a cloud service so they can be shared. Your username identifies you; SelectOR does not publish or share data with third parties.
- Updates: only packages digitally signed by the author, with their hash checked, are installed.
- Uninstall: delete the SelectOR.* and shape.mgfx files from the Open Rails folder.
Appendix · Ranks and badges
| Valid km | Rank | Valid km | Rank |
|---|---|---|---|
| 0 | Apprentice | 35,000 | Train Chief |
| 150 | Assistant Driver | 50,000 | Chief of Drivers |
| 500 | Driver | 70,000 | Traction Inspector |
| 1,200 | First-class Driver | 100,000 | Legend |
| 2,500 | Veteran | 150,000 | Icon of the Rail |
| 5,000 | Specialist | 250,000 | Grand Master |
| 10,000 | Expert | 400,000 | Master Major |
| 17,500 | Instructor | 600,000 | Railway Myth |
| 25,000 | Master | 1,000,000 | Immortal of the Rail |
Badges:
- Services: first trip, 10, 50, 100, 250, 500 and 1,000 services.
- Distance: 100, 1,000, 10,000, 50,000 and 100,000 km.
- Time: 10, 100, 500 and 1,000 hours.
- Routes: Explorer (5, 10 and 25 routes).
- Trains: 10 and 25 different trains.
- Passengers: 1,000, 10,000 and 100,000.
- Style: Clean driving, Flawless (50 services) and High speed (100 km/h average).
SelectOR © 2026 David MZP · GNU GPL v3. It uses the Open Rails libraries (openrails.org, GPL v3) and is not endorsed by the Open Rails team. Have a good trip!